Build a RESTful API using Spring Boot and store the data with MySQL
Introduction
This guide is on how to build a full RESTful API with Spring Boot so you can make CRUD operations on MySQL database.
You can find the code to the full project on my GitHub.
If you are unfamiliar with Spring Boot I have better introductory articles:
For any questions you can reach me on Twitter @tekbog
Architecture
The project will have two layers:
- Business (where the logic is): Service and Controller
- Data access layer: Repository and Entity

Additionally you would have a "view" layer to display the data properly using a front-end framework or JSP but this tutorial will only cover how to handle the API. If you are unfamiliar with some of these terms search for "MVC" and "3 tier" architectures.
Connect to the database
Before starting to code anything make sure your database is working and it's connected to your project. If everything is running then proceed to modify resources/application.properties file:
#autotable creation
spring.jpa.hibernate.ddl-auto=update
#db connected
spring.datasource.url=jdbc:mysql://localhost:3306/db_restful_example_spring
spring.datasource.username=root
spring.datasource.password=password
Entity and Lombok
The very first thing is to know the data we are going to store in our database, in this case it will be as follows:
- id (Long)
- data (String)
- email (String)
- name (String)
Once that's clear we will proceed to make an Entity Class:
import lombok.AllArgsConstructor;
import lombok.Data;
import lombok.NoArgsConstructor;
import lombok.NonNull;

import javax.persistence.*;

//we define this is an entity
@Entity
//using lombok
//generates all the boilerplate that is normally associated with simple POJOs (Plain Old Java Objects)
// and beans: getters for all fields, setters for all non-final fields, and appropriate toString, equals and hashCode
//https://projectlombok.org/features/Data
@Data
//generate constructors
// https://projectlombok.org/features/constructor
@NoArgsConstructor
@AllArgsConstructor
public class DataExample {
    //all entity objects need an id
    //in this case every time new data added to the object
    //we get a new id
    @Id
    @GeneratedValue(strategy = GenerationType.AUTO)
    @Column(name = "data_id", nullable = false)
    private Long dataId;

    //make sure the email is not null
    //https://projectlombok.org/features/NonNull
    @NonNull
    private String email;
    private String name;
    private String data;

}
We use Lombok to generate all the boilerplate code as explained above.
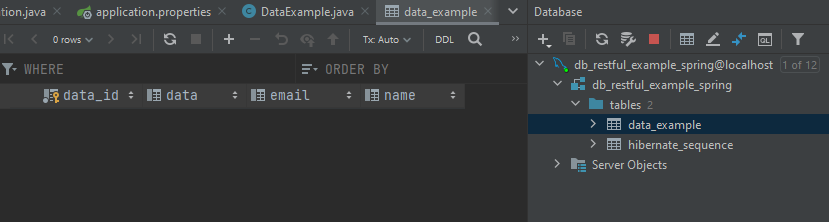
If you start the app you will generate the following table:
Set up the Repository
The Repository annotation allows us to access and modify the data however we want, and it also gives us a lot ofimplemented methods thanks to JPA. Additionally we can also use keywords to make methods we want without writing JPQL or additional queries.
import com.example.restfultutorialmysql.entity.DataExample;
import org.springframework.data.jpa.repository.JpaRepository;
import org.springframework.stereotype.Repository;

import java.util.List;

//this is the implementation of the DAO interface
//data access object which lets you access and modify data
//the parameters are <TypeOfData, TypeOfId>
@Repository
public interface DataExampleRepository extends JpaRepository<DataExample, Long> {

    //this are JPA additional methods
    //follow the docs to know how to create them
    //https://docs.spring.io/spring-data/jpa/docs/current/reference/html/#jpa.query-methods.query-creation
    //uncomment this and try to implement them in the Service yourself

//    //get data by email
//    List<DataExample> findDataExampleByEmail(String email);
//
//    //get data by name
//    List<DataExample> findDataExampleByName(String name);
//
//    //get data by id
//    List<DataExample> findDataExampleByDataId(Long id);
}
Service
Following good practice first I will set up the interface and afterwards implement all the methods.
The interface:
import com.example.restfultutorialmysql.entity.DataExample;

import java.util.List;

public interface DataExampleService {
    //GET
    List<DataExample> getAllData();

    //POST
    DataExample saveData(DataExample dataExample);

    //PUT
    DataExample updateDate(DataExample dataExample);

    //DELETE
    void deleteDataById(Long id);

}
The implementation:
import com.example.restfultutorialmysql.entity.DataExample;
import com.example.restfultutorialmysql.repository.DataExampleRepository;
import org.springframework.beans.factory.annotation.Autowired;
import org.springframework.stereotype.Service;

import java.util.List;

//we define this cass as a service
//so we can use it as a bean in our Controller
@Service
public class DataExampleServiceImpl implements DataExampleService{

    //bean injection
    //https://stackoverflow.com/questions/39890849/what-exactly-is-field-injection-and-how-to-avoid-it
    //the link above is to clarify if you get any kind of warning with @Autowired
    //we get the repository that will interact
    //with the database through our entity objects
    @Autowired
    DataExampleRepository dataExampleRepository;

    //implement all the CRUD methods
    //READ
    @Override
    public List<DataExample> getAllData() {
        return dataExampleRepository.findAll();
    }
    //CREATE
    @Override
    public DataExample saveData(DataExample dataExample) {
        return dataExampleRepository.save(dataExample);
    }
    //UPDATE
    @Override
    public DataExample updateDate(DataExample dataExample) {
        return dataExampleRepository.save(dataExample);
    }
    //DELETE
    @Override
    public void deleteDataById(Long id) {
        dataExampleRepository.deleteById(id);
    }
}
Note that we have implemented the CRUD operations: create, read, update and delete.
Controller: setting up our endpoints
Now that we have all good practices in place it's time to make our endpoints.
import com.example.restfultutorialmysql.entity.DataExample;
import com.example.restfultutorialmysql.service.DataExampleServiceImpl;
import org.springframework.beans.factory.annotation.Autowired;
import org.springframework.http.HttpStatus;
import org.springframework.http.ResponseEntity;
import org.springframework.validation.annotation.Validated;
import org.springframework.web.bind.annotation.*;

import java.util.List;

//@RestController annotation will make this class the controller
//meaning that it's listening to htttp://localhost:8080 calls
//and replying with whatever endpoints you have made
@RestController
//if you want to add the api version, which is good practice
//add this annotation
//localhost:8080/api/v1
//@RequestMapping("api/v1")
public class Controller {

    //we inject the service bean
    //and use it to handle the data
    //after every call to the endpoint we will do dataExampleService.method(methodParam);
    @Autowired
    DataExampleServiceImpl dataExampleService;

    //get all the data from the database using the service
    //once the call is successful respond with an OK status
    @GetMapping("/data")
    public ResponseEntity<List<DataExample>> getData(){
        return new ResponseEntity<List<DataExample>>(dataExampleService.getAllData(), HttpStatus.OK);
    }
    //you can also just get all the data
    //without making a ResponseEntity object
//    @GetMapping("/data")
//    public List<RandomData> getData(){
//        return dataService.getRandomData();
//    }

    //save the data you send and return CREATED
    //valid docs: https://commons.apache.org/proper/commons-lang/javadocs/api-3.1/org/apache/commons/lang3/Validate.html
    //difference with @Validated: https://stackoverflow.com/questions/36173332/difference-between-valid-and-validated-in-spring
    //ReQuestBody means you are expected to introduce data into your request
    @PostMapping("/data")
    public ResponseEntity<DataExample> saveDate(@Validated @RequestBody DataExample dataExample){
        return new ResponseEntity<>(dataExampleService.saveData(dataExample), HttpStatus.CREATED);
    }

    //update the data
    @PutMapping("/data")
    public ResponseEntity<DataExample> updateData(@RequestBody DataExample dataExample){
        return new ResponseEntity<>(dataExampleService.updateDate(dataExample), HttpStatus.OK);
    }

    //delete the data
    //PathVariable means you are expected to pass a parameter/variable
    //{id} translates into the Long id that you interact with afterwards
    @DeleteMapping("/data/{id}")
    public ResponseEntity<HttpStatus> deleteData(@PathVariable Long id){
        dataExampleService.deleteDataById(id);
        return new ResponseEntity<>(HttpStatus.NO_CONTENT);
    }

}
Testing our app
We will be using Postman for this purpose.
POST
First we will test the POST method:
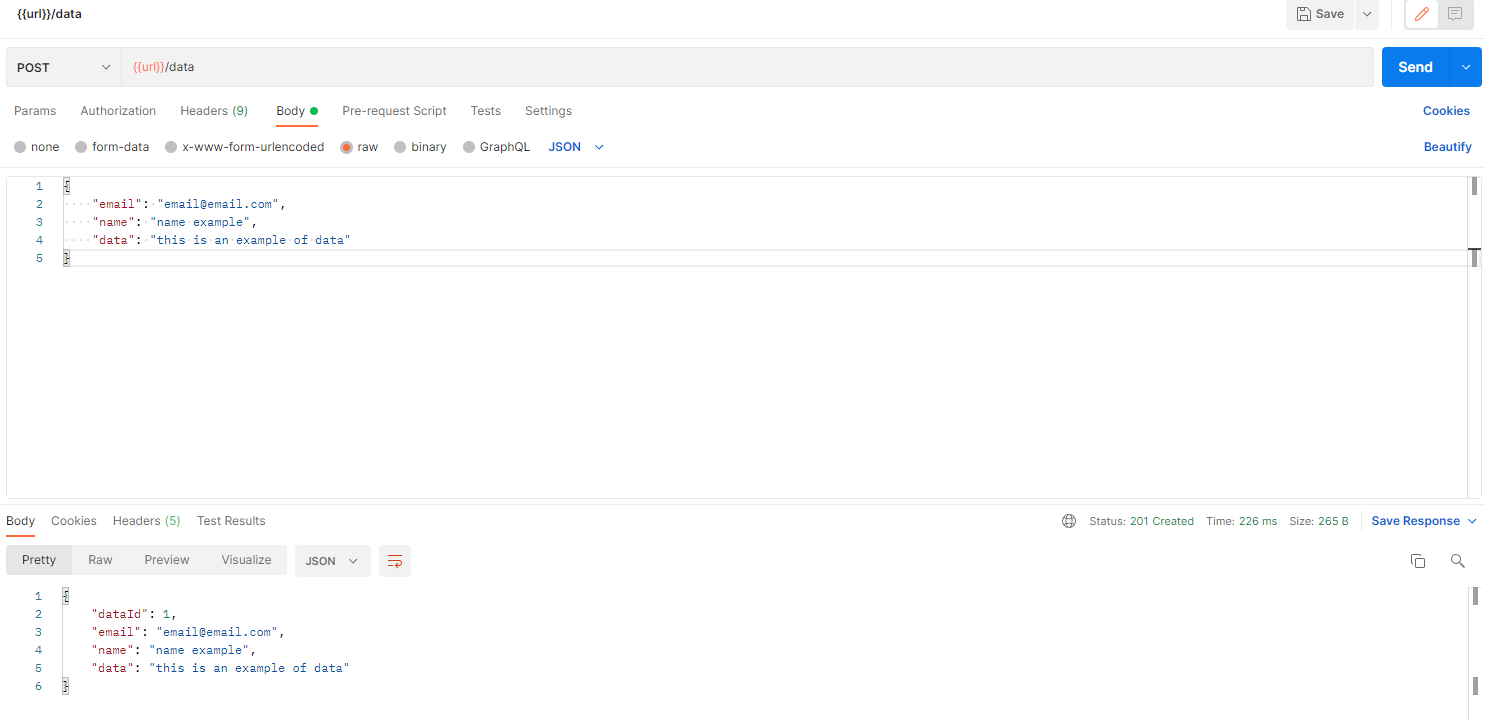
Make sure you send the data as raw->JSON
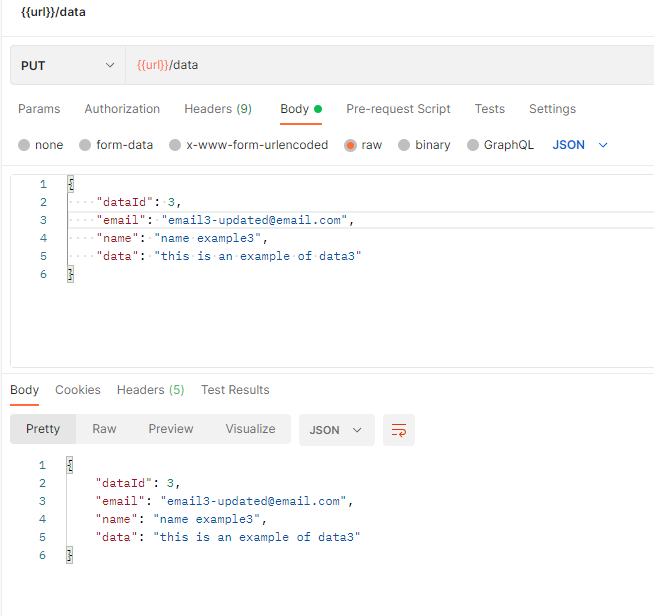
{
    "email": "email3@email.com",
    "name": "name example3",
    "data": "this is an example of data3"
}
As you can after we send the data we get it back with an assigned ID and a 201 OK status code.
The {{url}} is just a local variable that means:
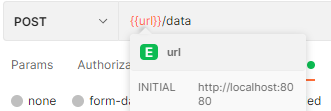
You can define local variables while working with Postman, in our case is http://localhost:8080 make sure you are using the correct port, if you want to make a call on postman without defining variables just write http://localhost:8080/data
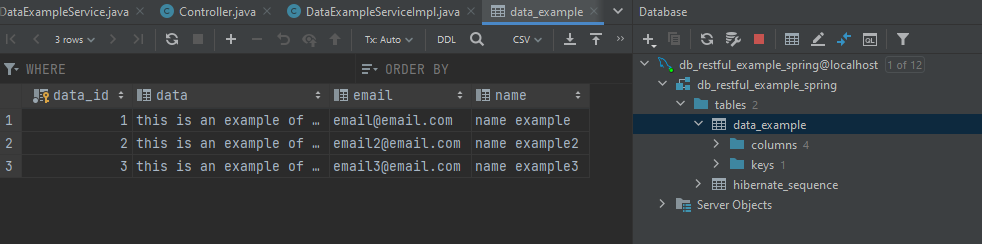
We have inserted data into our database, let's see if it's stored correctly:
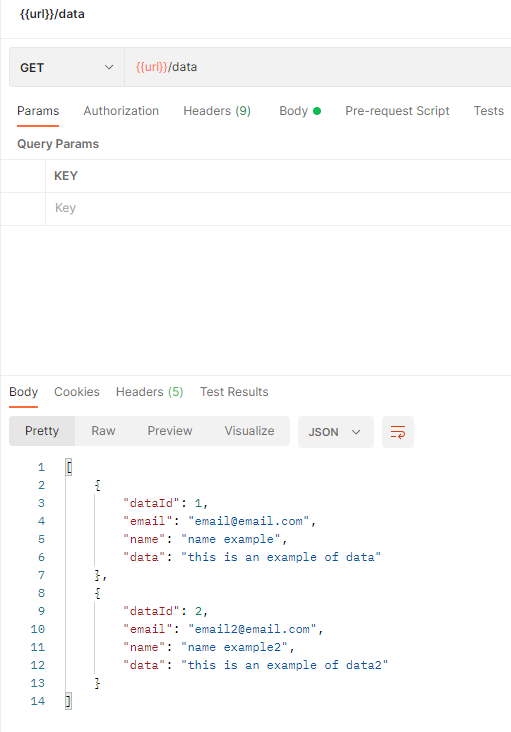
GET
And now let's test the GET method:
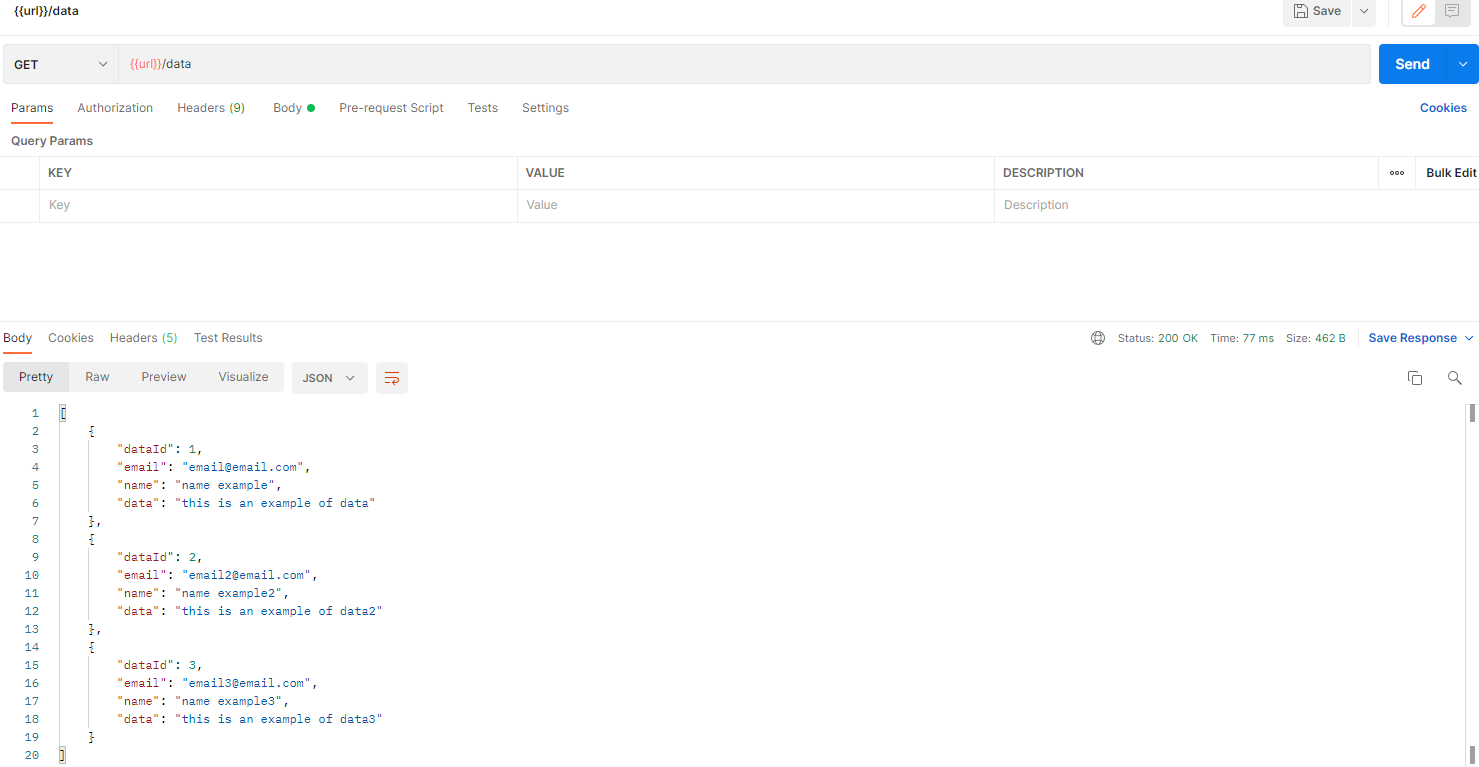
The returned status is 200, so everything works as expected.
PUT
DELETE
Finally we test the delete method by deleting one of the items in our database:
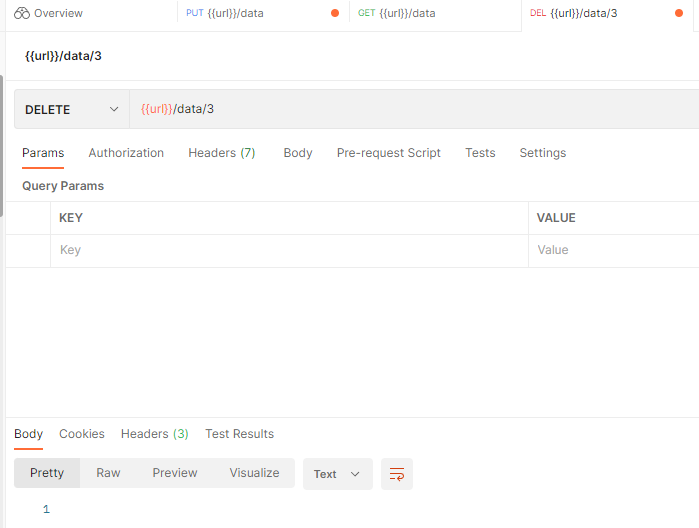 Check afterwards that it got deleted: