NodeJS auth: JWT, cookies, express, mongoose and more!
Tutorial to learn about auth, tokens and cookies

Intro
Here is the source code of the project from my Github.
This post is part of the MERN series, if you are lost or don't feel confident I'd recommend you read through the series to get familiar with NodeJS and Express. However you will find additional resources and links throughout the article.
If you want to yell at me you can find me on Twitter @tekbog.
Auth
What some people might call AUTH in reality is authentication and authorization. To sum it up I like to think about it this way:
Authentication: who are you?
Authorization: what can you do?
Authentication is about knowing the identity of the user while authorization is knowing what action the user is allowed to do, I'm paraphrasing from this .NET article.
If you still want to read more or a comparison check out this auth0 article.
Protect the password
In order to make our database secure for our users we will deal with the passwords by hashing and salting them. So bad agents can't access your user's data like pic related.

I'd recommend you read more about these concepts but here's a very quick summary that define them fairly well and you can also watch this video from ByteByteGo.
Hashing: map data of arbitrary size to fixed-size values
Salting: random data that is used as an additional input to a one-way function that hashes data
We are going to put user's data through a hash function with salt to make it secure. In order to do that we will use the bcrypt.js library.
Tokens
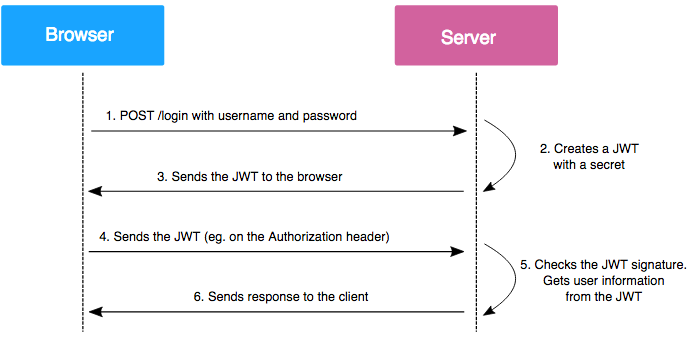
For us to identify (authenticate) the user every time the user wants to do something (authorize) we will be using JWT (JSON Web Token).
We generate a new token for every user that registers and store it in the database, afterwards we verify that the token is correct by comparing it with the same secret string we used to make the token.
So, to simplify:
- User registers or logs in and gets a token
- The token is stored in a cookie in our browser
- Every time the user wants to do something the user sends the token
- Every time the server gets a request from the user it checks if the token is correct
By using tokens the user doesn't have to log in every time, however the tokens expire after a while so from time to time we need to log in again.
We will see how tokens work and how to use them by storing them in a cookie.
To use JWT with NodeJS we will be using jsonwebtoken and to read (parse) cookies we will be using cookie-parser
Disclaimer
Before we start keep in mind this isn't a final product and it's just a tutorial (not ready for prod), if you are going to be implementing auth in production check passport.js and of course remember Helmet.
Additionally remember to ask your users for a strong password and make sure you don't make users without the right parameters.
The Project
Setup
For testing the REST API I will be using Postman and as the database I'm running Mongodb locally, however you can use Atlas or Docker.
For local variables I will use an .env file through the package dotenv. You can store your secrets there and afterwards use them inside your NodeJS project by typing process.env.YOUR_VAR.
If you are confused by any of this I'd recommend you start with the first entry of this series that you can find here. Or pick one from my MERN series.
Dependencies
Initialize the project with
npm init
Let's install everything we will need:
npm i bcryptjs cookie-parser dotenv express jsonwebtoken mongoose
Add the dev dependency
npm -D nodemon
Finally modify your package.json scripts like this:
  "scripts": {
    "start": "node index.js",
    "dev": "nodemon index.js"
  }
Now you can do npm start or npm run dev, if you are not familiar with nodemon then just know that it reloads the server with every change you make.
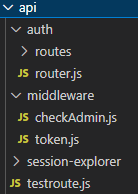
Project structure
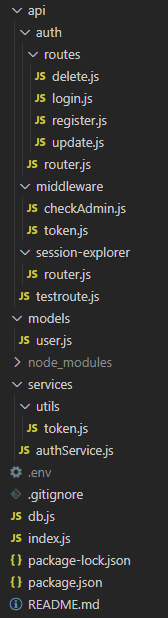
NB: Before you freak out keep in mind I've separated the files a lot so it would be easier to navigate, there's no unique way that every project has to be structured so just do whatever works for you as long as it makes sense: some people prefer more files and imports/exports while others prefer to keep one file with all the logic inside.
Additionally keep in mind instead of routes you can have a folder with controllers and no services, I think it depends a lot on your background and what you are used to. This structure works for me, however it shouldn't work for you or your organization.
Structure TL;DR
API folder: this is where our API is going to be aka our endpoints, I've made testroute.js so you start by getting familiar with imports/exports and making sure the server runs and you get familiar with express.Router().
Then inside api/session-exporer we will have a router with two routes to explore what tokens and cookies are.
Afterwards there's a middleware folder with middleware to check cookies and verify tokens as well as to check if the logged user is an admin.
The last auth folder is where our REST api is located, we have one router and inside the routes folder you will find the different routes/endpoints. However the logic is stored inside servicess folder which has a subfolder for utils functions.
The last folder I haven't mentioned is models that contains our mongoose schema.
.env
One of the first things we should do is generate the signature key for our server, we can it with this command:
node -e "console.log(require('crypto').randomBytes(256).toString('base64'));"
Then store the result in our .env file (which is included in .gitignore)
PORT=5000
TOKEN_KEY=8bf0698c0908f00edf6b4efeb837cd52baef165b9029c7a06648ef23e0a0fdfda1cdd758e67597480f74424793848596
Database
Note that you might need to modify this, depending where your database is located but overall your db.js file should look something likes this:
const mongoose = require("mongoose");
const localDB = "mongodb://localhost:27017/auth";

const connectDB = () => {
  try {
    mongoose.connect(localDB, {
        useNewUrlParser: true,
        useUnifiedTopology: true,
    });
    console.log("MongoDB Connected...");
  } catch (err) {
    console.error(err.message);
    process.exit(1);
  }
};

module.exports = connectDB;
Entry point: index.js
This is the file Node runs when you start the server
//interact with our .env file
require("dotenv").config();
// --- routers ---
const authRouter = require("./api/auth/router");
const sessionExplorerRouter = require('./api/session-explorer/router');
const { routerTest } = require('./api/testroute');

//get our db connection
const connectDB = require("./db");
//import express package
const express = require("express");
//middleware to read cookies
//http://expressjs.com/en/resources/middleware/cookie-parser.html
const cookieParser = require('cookie-parser');

//get our express app
const app = express();
//get port from our .env file
const PORT = process.env.PORT || 5000;

// -- MIDDLEWARE
app.use(express.json());
app.use(cookieParser());
// -- MIDDLEWARE

// -- ROUTES --

//hello world on: http://localhost:5000/
app.get("/", (req, res) => res.send("Hello World!"));

//make sure everything is set up correctly
//http://localhost:5000/test
app.use('/test', (req, res) => res.send("from test!"));

//router test to make sure you know how to use middleware and imports/exports
//call example: http://localhost:5000/api/cookie
app.use('/api', routerTest);

//session explorer endpoints to understand cookies and jwt
app.use('/api', sessionExplorerRouter);

//get the router from api/auth/router and use the endpoints (routes) from api/auth/routes
//call example: http://localhost:5000/api/auth/login
app.use('/api/auth', authRouter);

// -- ROUTES --

//connect to db
connectDB();

//start listening on the designed port
app.listen(PORT, () => console.log(`Example app listening on port ${PORT}!`));


// The unhandledRejection listener
//The unhandledRejection event is emitted whenever a promise rejection is not handled.
//NodeJS warns the console about UnhandledPromiseRejectionWarning and immediately terminates the process.
//The NodeJS process global has an unhandledRejection event.
process.on('unhandledRejection', error => {
    console.error('unhandledRejection', error);
});
User schema
Inside models/user.js you will find the Mongoose schema that we will use to interact with MongoDB. You make a schema for your data, export it and then you can interact with the data in your database through Mongoose predefined methods like User.findById().
The most complicated thing we will be doing is updating the database, if you are unfamiliar with the term atomic check out this article.
const mongoose = require('mongoose')

const UserSchema = new mongoose.Schema({
    username: {
        type: String,
        required: true,
        unique: true
    },
    password: {
        type: String,
        required: true,
        minlength: 6,
    },
    role: {
        type: String,
        default: 'Basic',
        required: true
    },
    token: {
        type: String
    }
})

const User = mongoose.model('User', UserSchema)
module.exports = User;
Services
Before going into our API let's check our logic that lives inside the services folder. Each service gets exported so it's easier to use inside our API folder, however this is on the over-complicated side.
Depending on your project you could just add everything into your routes/controllers or perhaps you'd want to add responses to services as well and break it into more folders or files.
As I said the file structure and overall organization depends on you, this is what I found useful for this project. Later you will see how we just import our authService inside our API folder and use the various functions (if you are familiar with OOP you can consider the auth service as our main object and functions the methods that we call after initializing the object through an import).
authService.js contains the main chunk of logic however we also have a small token.js file inside our utils folder.
authService.js:
const User = require('../models/user')
const bcrypt = require('bcryptjs')
require('dotenv').config()
const utils = require('./utils/token')

exports.getUserByUsername = async (username) => {
    console.log('inside authService')
    return await User.findOne({ username })
}

exports.getUserById = async (id) => {
    return await User.findById(id)
}

exports.getUserByIdAndDelete = async (id) => {
    return await User.findByIdAndDelete(id)
}

exports.registerUser = async (username, password) => {

    //generate salt, it can take a while so we use await
    const salt = await bcrypt.genSalt(10);
    //hash password
    const hashedPassword = await bcrypt.hash(password, salt);

    //2 hours to expire in seconds
    const maxAge = 2 * 60 * 60
    //get token from our utils folder
    const token = utils.getToken(username, maxAge)
    console.log({ token })
    //create new user using mongoose schema from models
    const newUser = await User.create({
        username: username,
        password: hashedPassword,
        token: token
    });

    console.log('making USER after token b4 cookie----')
    console.log({ newUser })
    //return all the elements we are going to use
    return { newUser, token, maxAge }

}

exports.loginUser = async (username, password) => {
    //get the user
    const user = await User.findOne({ username })
    //validate the hashed password we have in our database
    const validPassword = await bcrypt.compare(password, user.password)
    //2 hours to expire in seconds
    const maxAge = 2 * 60 * 60
    //set up the jwt token
    const token = utils.getToken(username, maxAge)

    //add token to the user
    user.token = token
    //remember to save your modification
    //https://masteringjs.io/tutorials/mongoose/update
    await user.save()

    console.log({ token })

    return { user, validPassword, token, maxAge }
}

exports.updateUser = async (id) => {

    //get the user
    const userToUpdate = await User.findById(id)
    //check if the user is already an admin
    if(userToUpdate.role === 'Admin'){
        throw new Error('The user is already an admin')
    }
    userToUpdate.role = "Admin"
    userToUpdate.save()

    return userToUpdate
}
utils/token.js
const jwt = require('jsonwebtoken')

//sign and make a new token for the user
exports.getToken = (username, expirationTime) => {
    //example of seeting up expiration time
    //2 hours to expire in seconds
    //const maxAge = 2 * 60 * 60

    //generate token for the user
    const token = jwt.sign(
        { username },
        process.env.TOKEN_KEY,
        {
            expiresIn: expirationTime //2h in seconds
        }
    )

    return token
}
API
This is the most important part of the project. If you don't know routing, HTTP request and response methods or your way around middleware in Express I'd recommend you check some quick tutorials to understand the concepts before digging in but here's a very small and incomplete summary:
Routing: by creating different endpoints (or routes? - see link for differences) we allow the user to go/call those specific endpoints with parameters and different HTTP requests to get the data they want.
HTTP methods are conventions that indicate the desired actions we request and respond with.
Middleware is the middle layer that goes between requests and/or responses, say you want to modify or add some data to the request of the user before it reaches the desired endpoint? That's what middleware does.
In our case we verify that the user is logged in and that it's an admin before sending it to our updateuser route.
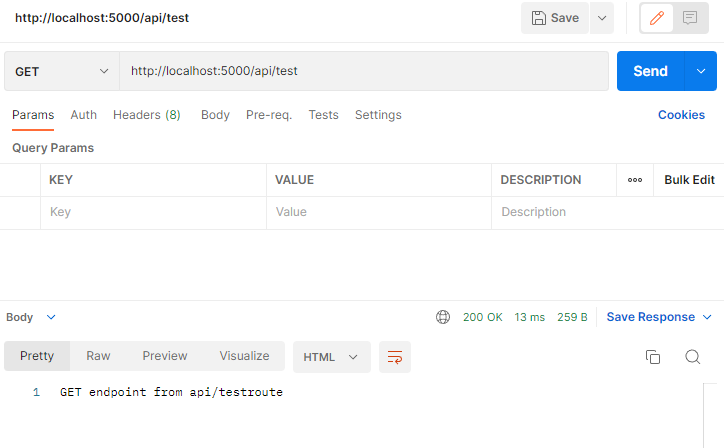
testroute.js
This is just a test route to make sure everything works in our server:
const express = require("express");
const routerTest = express.Router();

routerTest.route("/test").get((req, res) => res.send("GET endpoint from api/testroute"));

module.exports = {
    routerTest,
}
Inside index.js we import it and then define the route:
//import the route
const { routerTest } = require('./api/testroute');

....

//router test to make sure you know how to use middleware and imports/exports
//call example: http://localhost:5000/api/test
app.use('/api', routerTest);
This is the response we get from calling that route
API/auth
Let's jump into our auth folder and see how it works.
This is router.js:
const express = require("express");
const router = express.Router();
const { login } = require("./routes/login");
const { register } = require("./routes/register");
const { updateUserToAdmin } = require("./routes/update");
const { deleteUser } = require("./routes/delete");

//get middleware
const verifyAccessToken = require("../middleware/token");
const checkAdmin = require("../middleware/checkAdmin");

router.route("/register").post(register);
//we can have the same route with different request types
router.route("/register").get((req, res) => res.send("Hello World!"));

//call example: http://localhost:5000/api/auth/login
router.route("/login").post(login);

router.route("/deleteuser").delete(deleteUser);

//load middleware
//make sure the user is logged
router.use(verifyAccessToken);
//make sure the logged user is an admin
router.use(checkAdmin);
//if the previous middleware doesn't throw an error then we update the user
//call example: http://localhost:5000/api/auth/updateuser/62c8ed790c6812f9ddcc1100
router.route("/updateuser/:id").put(updateUserToAdmin);

module.exports = router;
For now let's just focus on the register route.
API/auth/routes/register
const authService = require("../../../services/authService");

exports.register = async (req, res, next) => {
    console.log("inside register");

    const { username, password } = req.body;
    console.log("req body is ", req.body);

    //check if the username already exists
    const oldUser = await authService.getUserByUsername(username);

    console.log({ oldUser });
    if (oldUser) {
        return res.status(409).send("user already exists");
    }

    //simple rule for the password
    if (password.length < 6) {
        return res.status(400).json({ message: "password less than 6 characters" });
    }

    try {
        //define variables with destructuring
        //https://developer.mozilla.org/en-US/docs/Web/JavaScript/Reference/Operators/Destructuring_assignment
        const { newUser, token, maxAge } = await authService.registerUser(
            username,
            password
        );
        //send our cookie with the token
        res.cookie("jwt", token, {
            httpOnly: true,
            maxAge: maxAge * 1000, //convert 2h to ms; maxAge uses miliseconds
        });

        //response status and display the created user
        return res.status(201).json({
            message: "User created successfully",
            newUser,
        });
    } catch (err) {
        //if there are any errors we will get a message back
        return res.status(401).json({
            message: "User not created",
            error: err.message,
        });
    }
};
Check how we are using our function from the services folder through authService.registerUser().
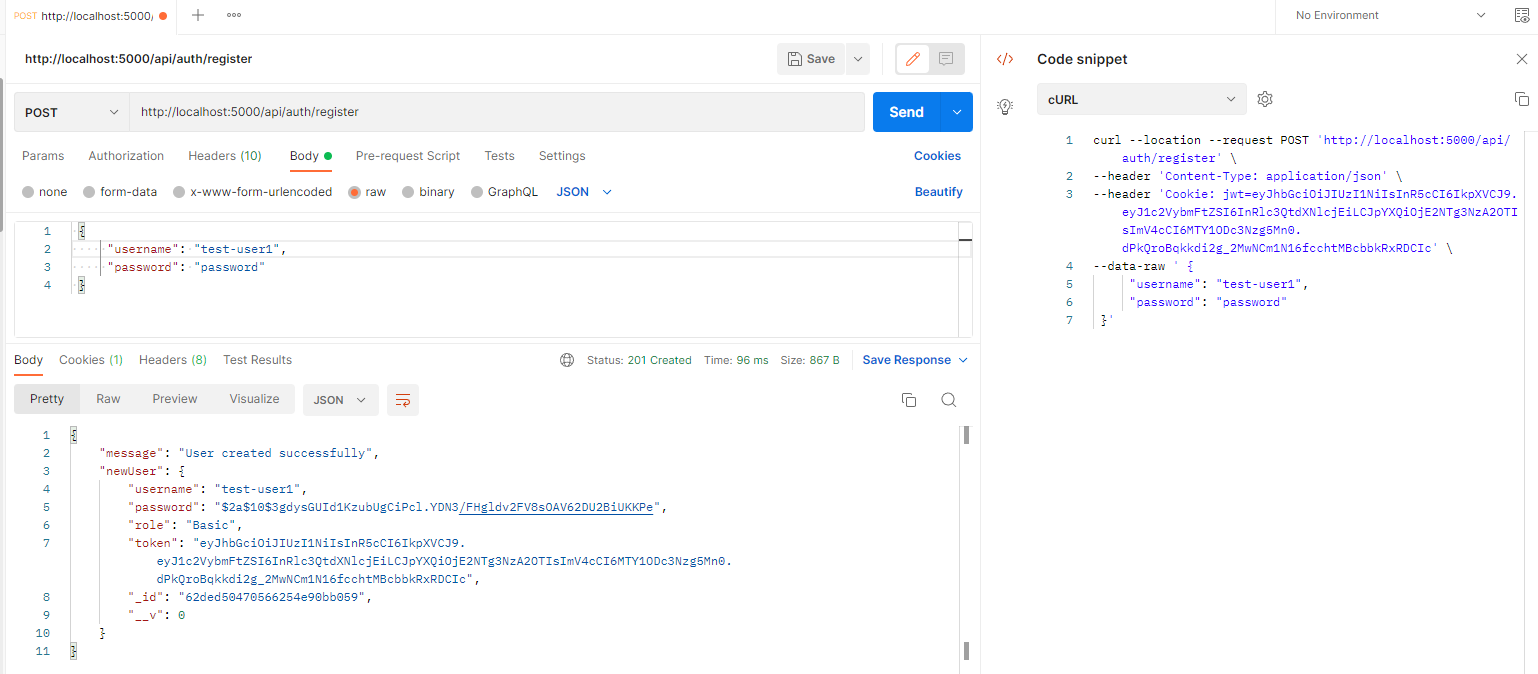
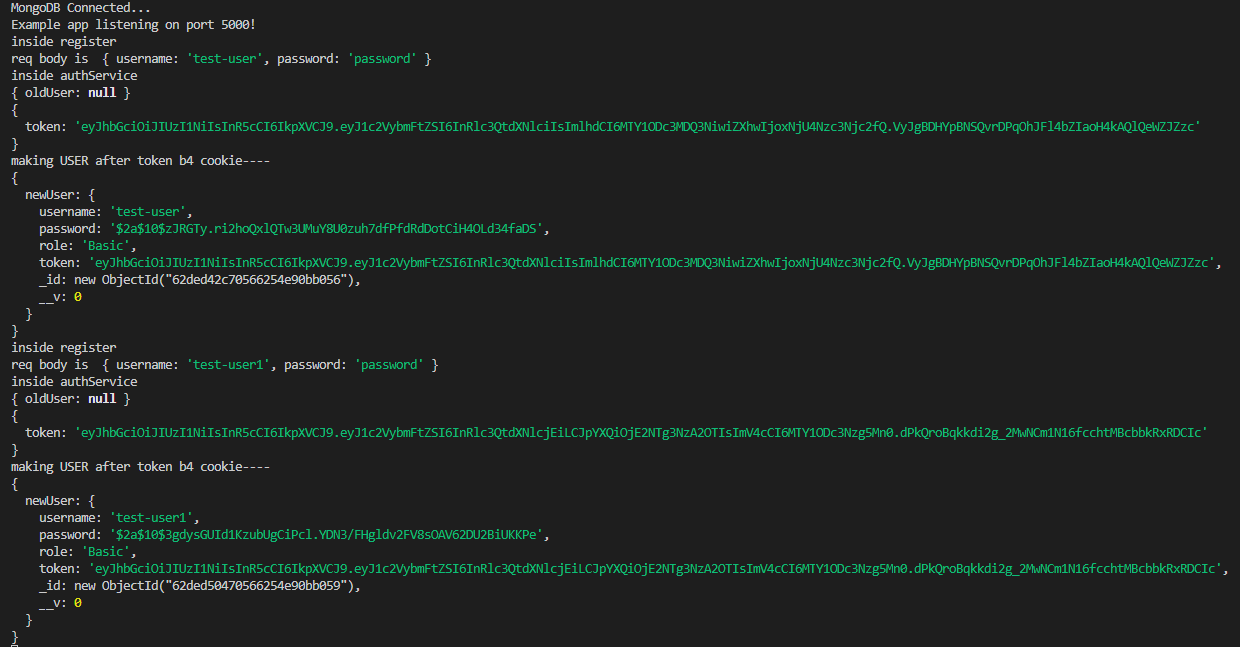
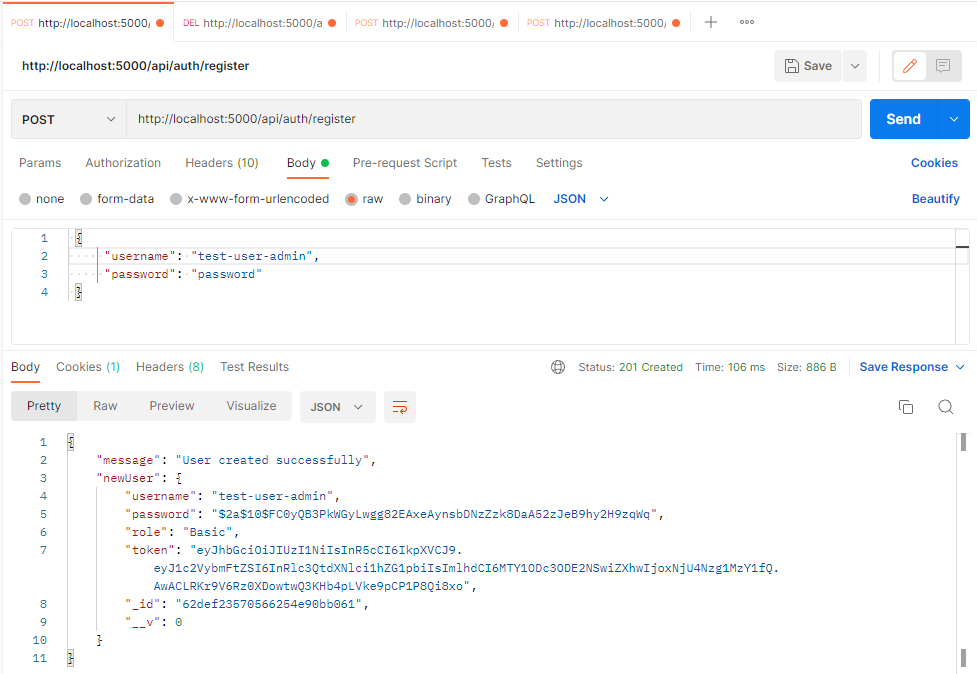
Let's use Postman with raw data as JSON to make the following call on
http://localhost:5000/api/auth/register endpoint.
It should look like this:
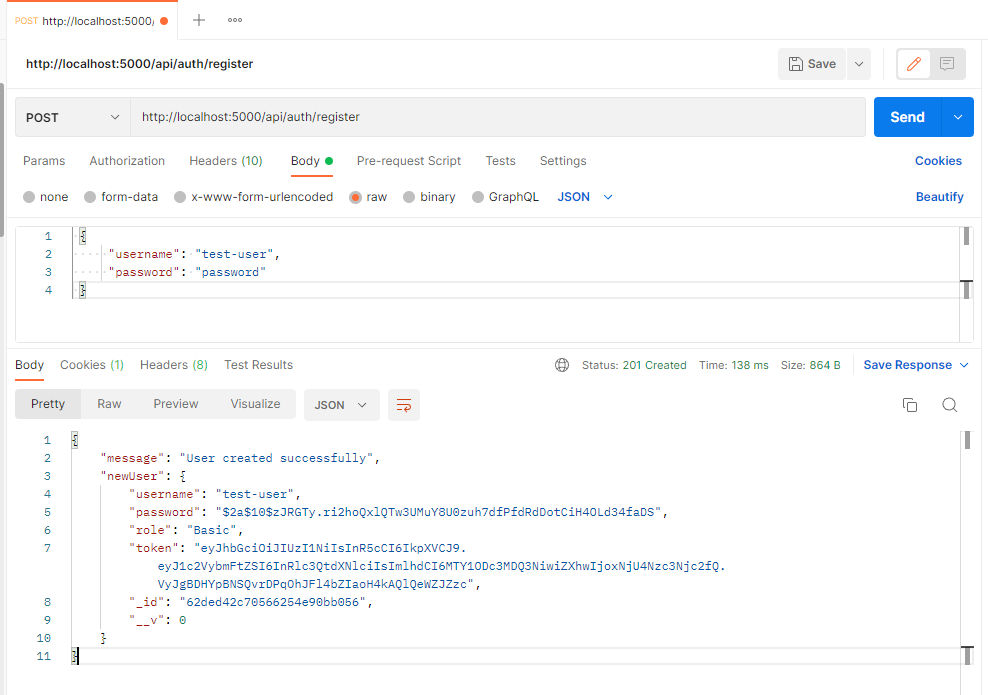
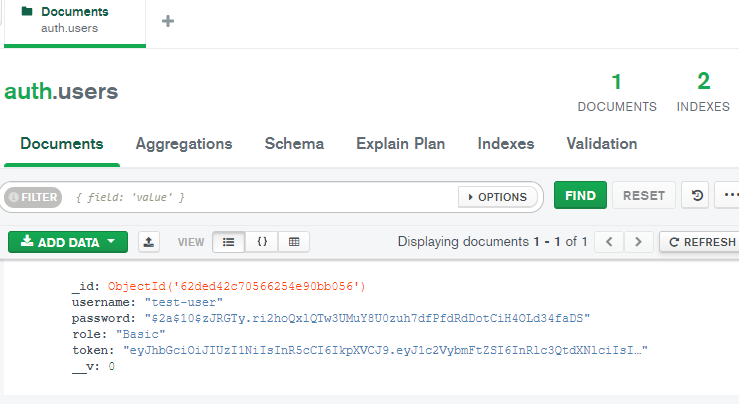
And if we check our MongoDB we should see the user we just created here:
Let's make a second user as well.
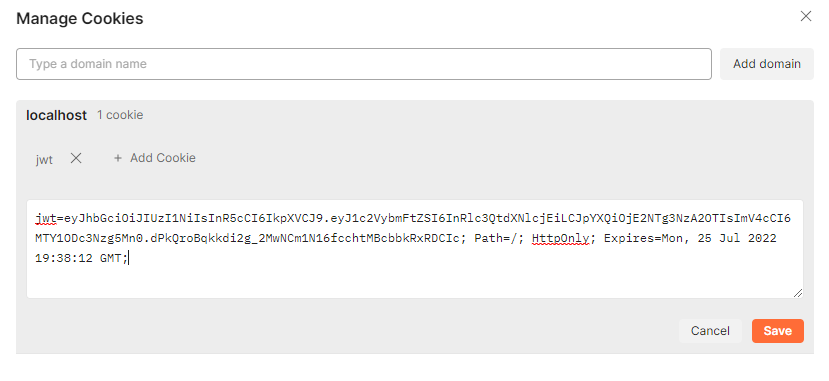
Notice that once we create a user we get a cookie stored in postman, if you click on "Cookies" button you should see something like:
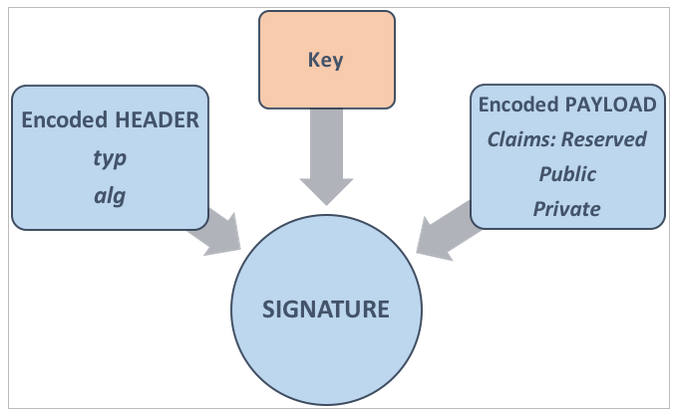
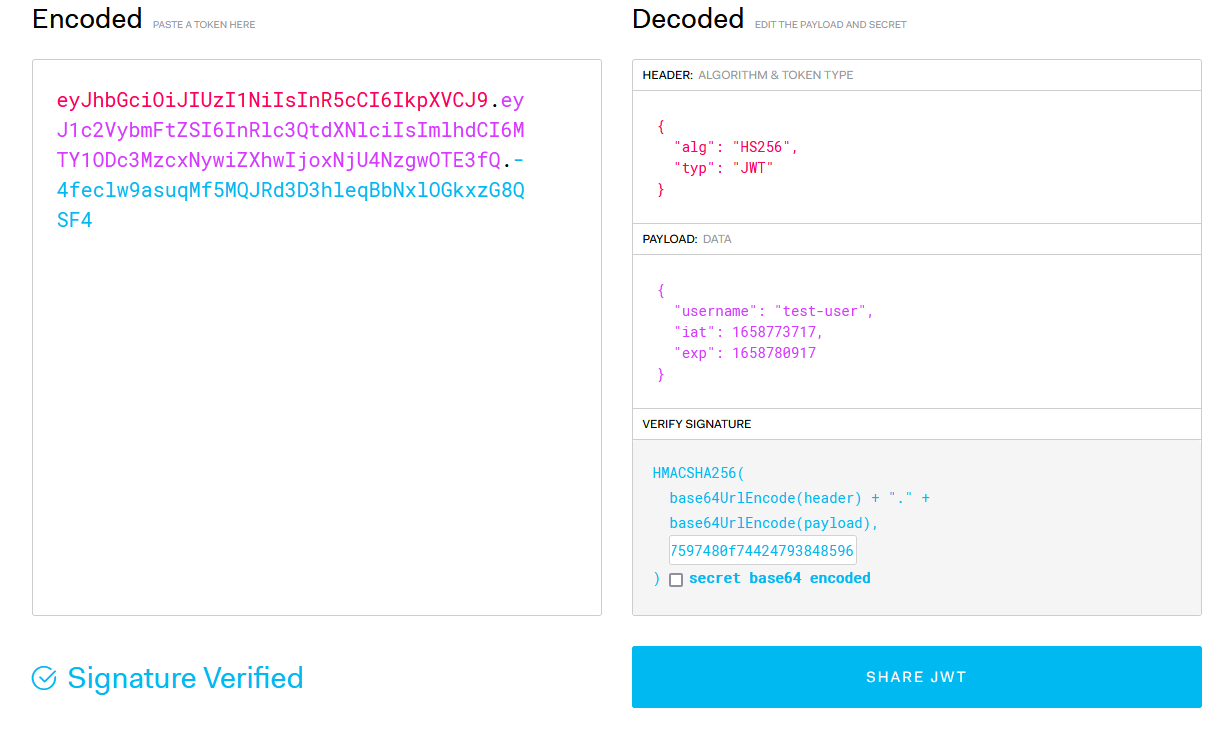
This is our JSON Web Token (JWT):
eyJhbGciOiJIUzI1NiIsInR5cCI6IkpXVCJ9.eyJ1c2VybmFtZSI6InRlc3QtdXNlcjEiLCJpYXQiOjE2NTg3NzA2OTIsImV4cCI6MTY1ODc3Nzg5Mn0.dPkQroBqkkdi2g_2MwNCm1N16fcchtMBcbbkRxRDCIc
If we go to jwt.io and paste the token this is what we will see:
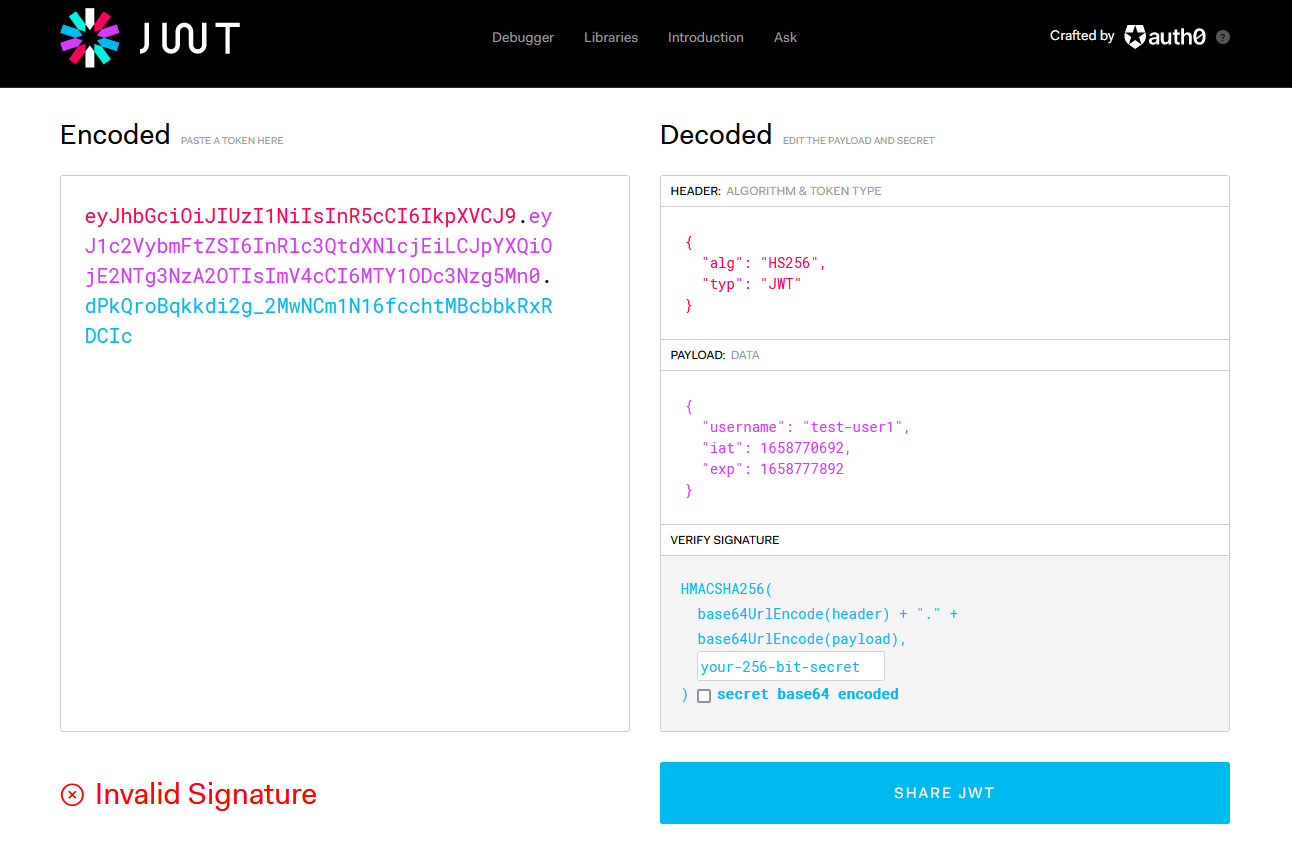
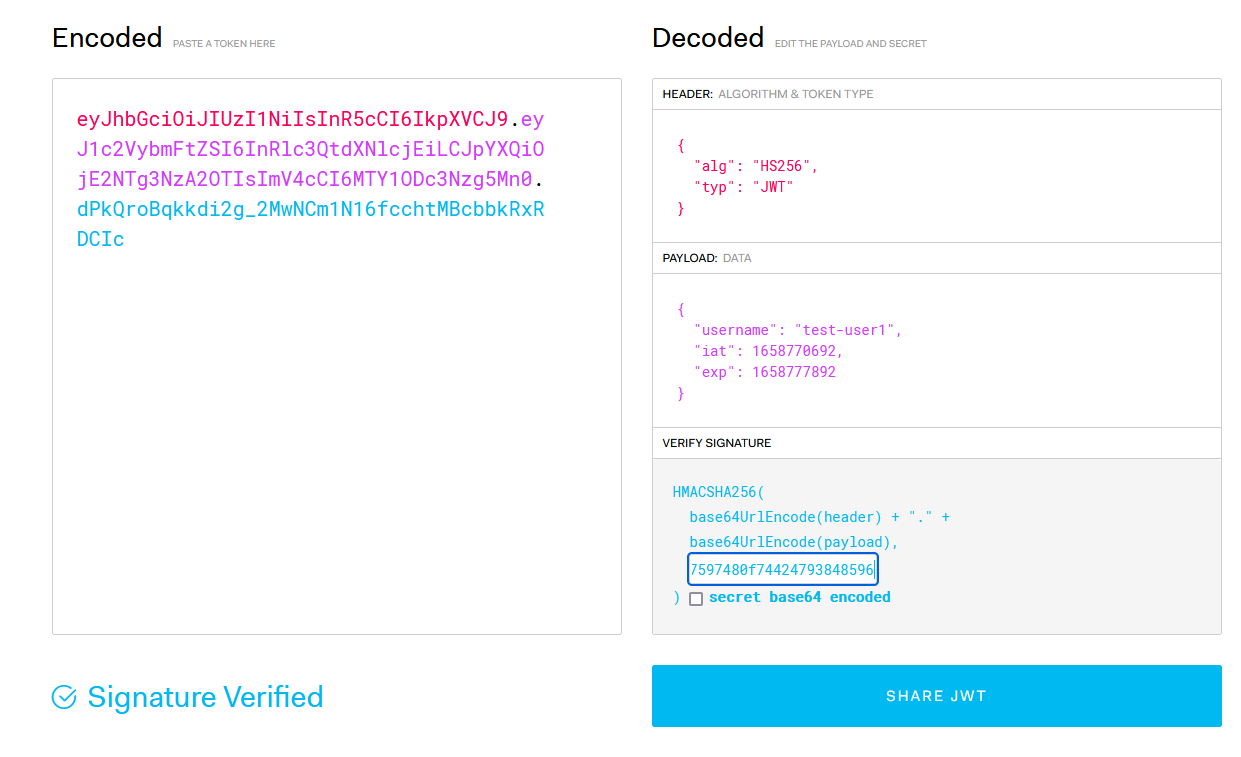
Once we paste our signature (TOKEN_KEY from our .env file) you should see how the site changes as well:
Finally I'd like to mention that I left a lot of console.logs around for you to see how everything works and why it's doing what, so feel free to add your own logs or at least check the console when calling different endpoints:
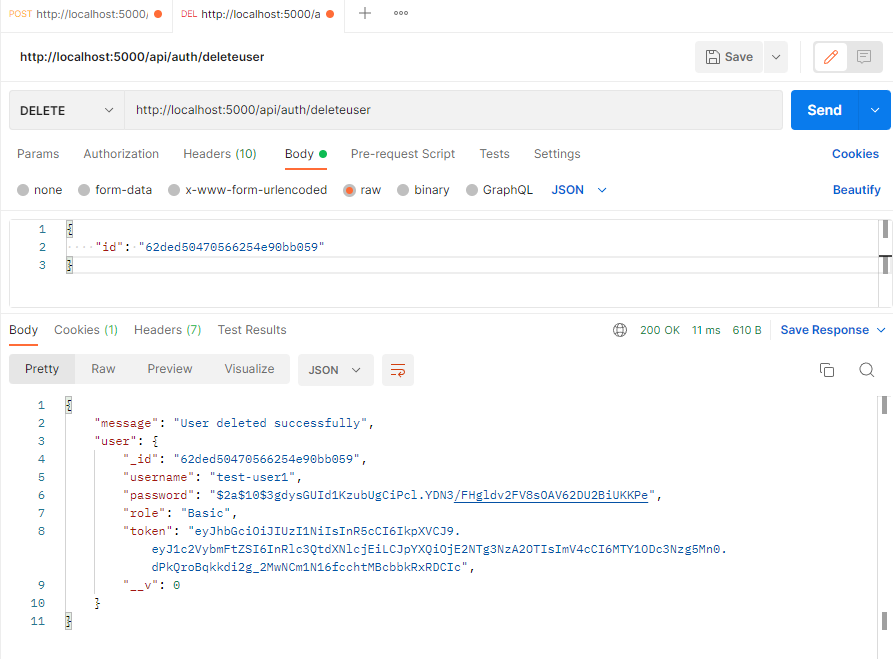
API/auth/routes/delete
We have made our users but let's see a very simple way to delete one of them. Note that I'm not using query parameters (we will do something more complicated with the update endpoint) but instead I'm sending the id through the request body.
The delete route is as follows:
const authService = require('../../../services/authService')

exports.deleteUser = async (req, res, next) => {
    const { id } = req.body;
    //if there's no id then we can't do anything
    if (!id) {
        return res.status(400).json({ message: "missing id" });
    }

    try {
        //this service returns the deleted user if it exists
        const user = await authService.getUserByIdAndDelete(id)
        //if user doesn't exist then we can't do anything
        if (!user) {
            return res.status(404).json({
                message: "Could not delete user",
                error: "User not found",
            });
        }
        //return success if the user is deleted
        return res.status(200).json({
            message: "User deleted successfully",
            user,
        });
    } catch (err) {
        return res.status(409).json({
            message: "User not deleted",
            error: err.message,
        });
    }
}
Let's try it by hitting this endpoint with a delete method:
http://localhost:5000/api/auth/deleteuser
Note that we need to get the ObjectId from our users, which you can find in MongoDB:
62ded50470566254e90bb059

And this is the call we do in postman:
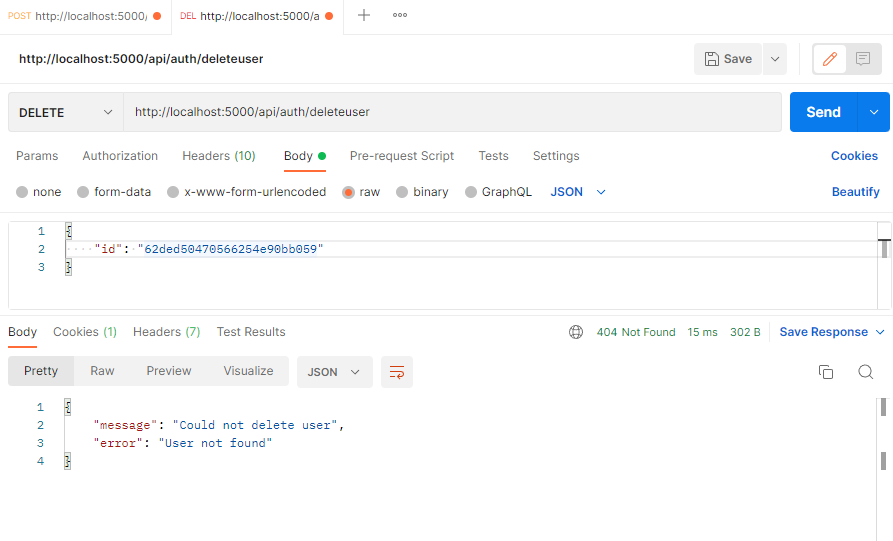
If we hit it again we can see that the error message is handled correctly, same if we type the user id wrong:
API/auth/routes/login
Let's look at our login endpoint, it also gives us a cookie with a newly made token so we stay logged in, this is the login.js file:
const authService = require("../../../services/authService");

exports.login = async (req, res, next) => {
    const { username, password } = req.body;
    console.log("login req body is ", req.body);
    //simple checker for username and password
    if (!username || !password) {
        return res.status(400).json({ message: "username or password is missing" });
    }

    try {
        //get the data from our auth service
        const { user, validPassword, token, maxAge } = await authService.loginUser(username, password)
        //check if the user exists
        if (!user) {
            return res.status(401).json({
                message: "Login not successful",
                error: "User not found",
            });
        }
        //return error if the password is incorrect
        if (!validPassword) {
            return res.status(401).json({
                message: "Login not successful",
                error: "Password is incorrect",
            });
        }
        //send our cookie with the token
        res.cookie("jwt", token, {
            httpOnly: true,
            maxAge: maxAge * 1000, //convert 2h to ms; maxAge uses miliseconds
        });

        //if everything is good return the user
        return res.status(200).json({
            message: "Login successful",
            user,
        });

    } catch (err) {
        res.status(401).json({
            message: "Login not successful",
            error: err.message,
        });
    }
};
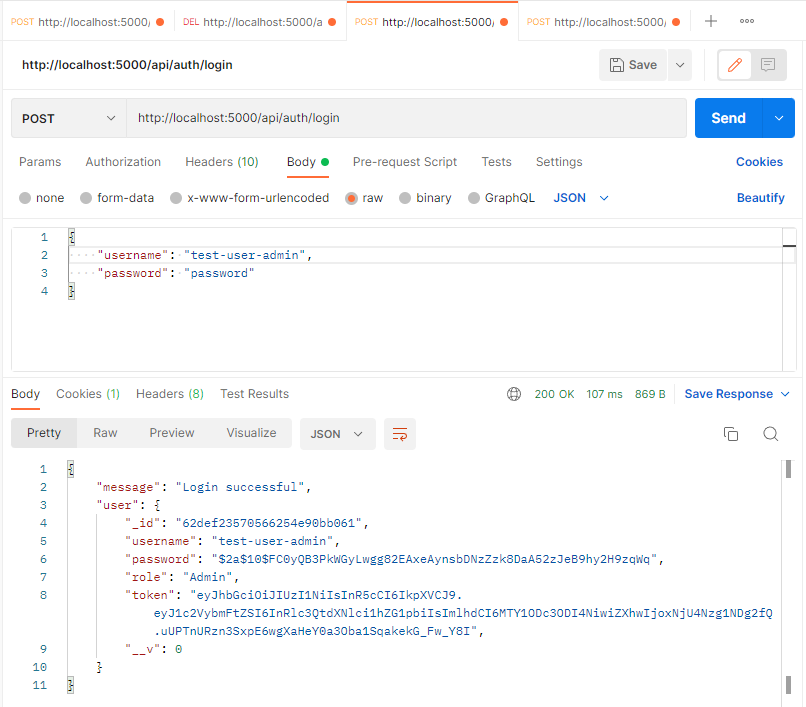
This is what we get if we call our endpoint:
http://localhost:5000/api/auth/login
as long as the user exists in the database.
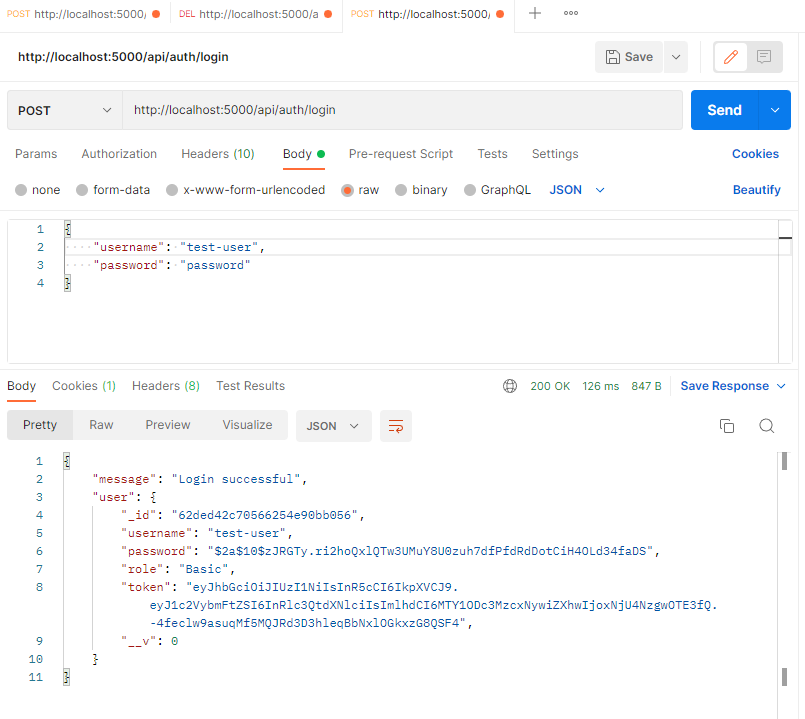
We get our token through our authService and afterwards we send it to the user:
        //send our cookie with the token
        res.cookie("jwt", token, {
            httpOnly: true,
            maxAge: maxAge * 1000, //convert 2h to ms; maxAge uses miliseconds
        });
Inside authService on L52 you can see the following:
    //set up the jwt token
    const token = utils.getToken(username, maxAge)
we generate the token thanks to the function in services/utils/token.js
    //generate token for the user
    const token = jwt.sign(
        { username },
        process.env.TOKEN_KEY,
        {
            expiresIn: expirationTime //2h in seconds
        }
    )
If you check the console of our server (the node app we are running) you can see the generated token, I recommend adding more logs at every bit of code that you are curious about although there are better ways to debug it:

API/Session-explorer
Now, before we go to our last endpoint updateuser let's understand a bit better how tokens and the communication with the server works, as well as middleware.
api/session-explorer/router
const express = require("express");
const router = express.Router();
const verifyTokenMiddleware = require("../middleware/token")

//route to read our cookies after loggin in
router.route("/cookie").get((req, res) => {
    console.log('cookies: ', req.cookies)
    res.status(200).json({
        cookies: req.cookies
    })

});

//read more on middleware here: https://expressjs.com/en/guide/using-middleware.html
//token endpoint to check out how verifyToken middleware works
//if the token isn't correct then our middleware in /middleware/token gives an error responde
router.route("/token").post( verifyTokenMiddleware, (req, res) => {
    // in case you want to read everything from the request header
    // console.log({req})
    res.status(200).send("token correct: access granted!")
})


module.exports = router
After logging in and having our cookie let's get a request from
http://localhost:5000/api/cookie
Which should return our cookie where the JWT token is stored:
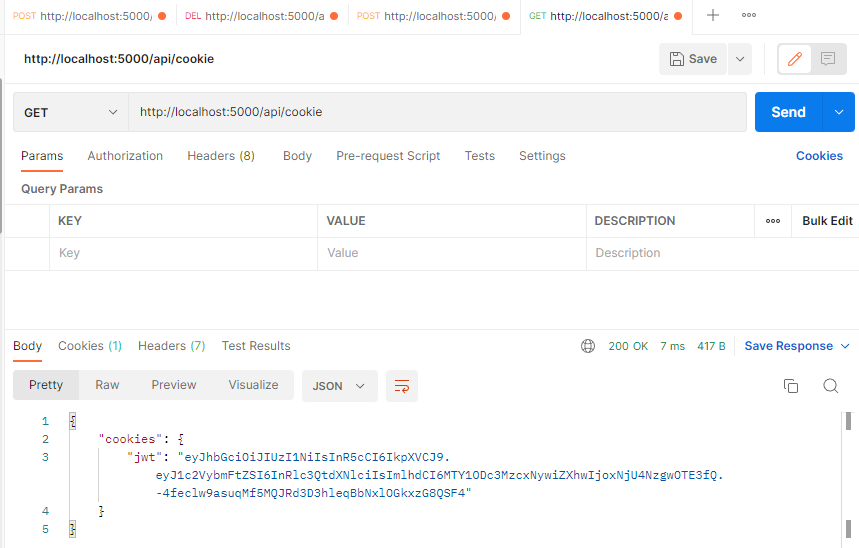
Note that we are able to get cookies thanks to the middleware cookie-parser and interact with json thanks to express.json, we declared that middleware in our index.js file:
// -- MIDDLEWARE
app.use(express.json());
app.use(cookieParser());
// -- MIDDLEWARE
So in order to access our cookies we just need to type:
req.cookies
Middleware
middleware/token
Before jumping to our /token endpoint let's understand the middleware we have.
We are using token.js to verify that the token we get is correct:
const jwt = require("jsonwebtoken");
require("dotenv").config();

//this only works if you use cookie-parser
const checkCookie = (req) => {
    console.log('inside checkCookie')
    console.log('all our cookies are: ', req.cookies)
    //we get the jwt cookie we need
    return req.cookies['jwt']
}

//middleware for verifying the JWT
const verifyAccessToken = (req, res, next) => {
    //define token
    let token;

    //authenticate through Bearer token
    if (req.headers.authorization && req.headers.authorization.startsWith("Bearer ")) {
        token = req.headers.authorization.split(' ')[1]
        //logs so you see what's happening
        console.log('auth bearer token')
        console.log({ token })
    }
    else {
        token = req.headers["x-access-token"] || checkCookie(req) || null
        //logs
        console.log('our token is from x-access-token header, a cookie or null')
        console.log({ token })
    }

    //if we can't get our token anywhere then the response is an error
    if (!token) {
        return res.status(403).send("A token is required for authentication");
    }
    try {
        //we use the JWT library to verify the token
        //and we need to know the token_key which we encrypted our information
        const decoded = jwt.verify(token, process.env.TOKEN_KEY);
        //log
        console.log({ decoded })
        //the middleware adds the user information to the request and sends it to the route
        req.user = decoded;
    } catch (err) {
        return res.status(401).send("Invalid Token");
    }
    //if you have doubts check Express middleware docs: http://expressjs.com/en/guide/using-middleware.html
    return next();
};

module.exports = verifyAccessToken;
Note how we can get our token from a cookie or headers:
req.headers.authorization and req.headers.authorization.
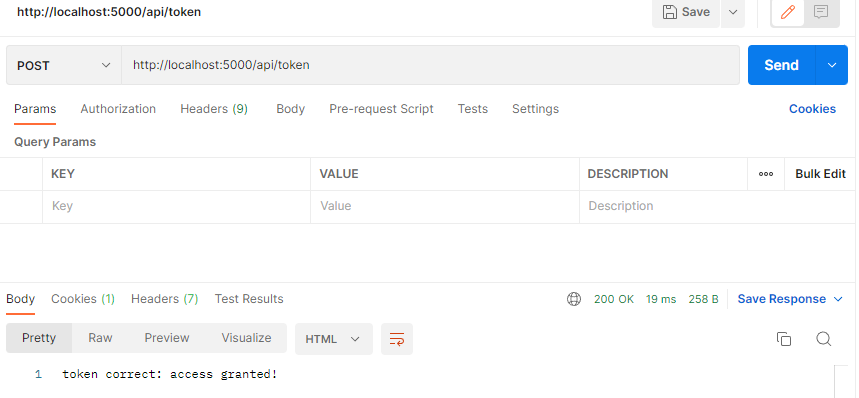
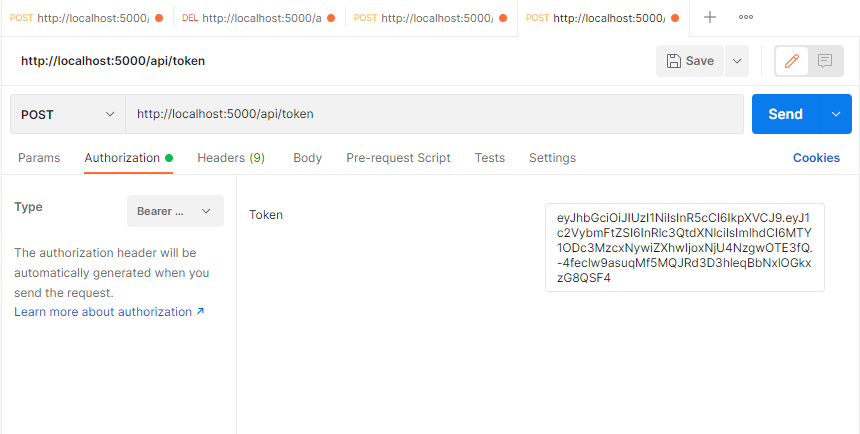
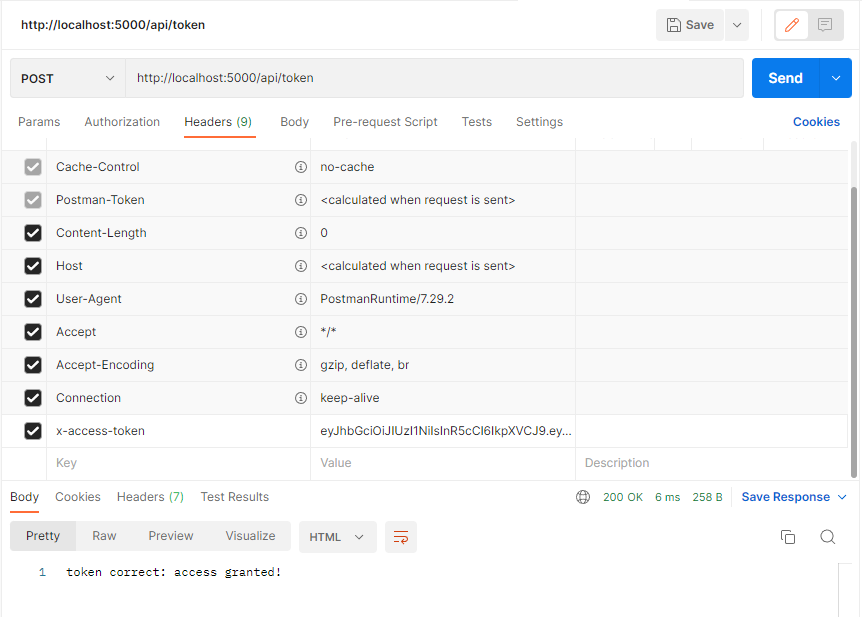
Now while logged in (having our cookie) let's hit our /token endpoint which is using this middleware (remember to use a POST method):
Inside the token.js file we are using this function:
const checkCookie = (req) => {
    console.log('inside checkCookie')
    console.log('all our cookies are: ', req.cookies)
    //we get the jwt cookie we need
    return req.cookies['jwt']
}
to check if the cookie exists (or get it). Then we store the token in the variable:
token = req.headers["x-access-token"] || checkCookie(req) || null
And afterwards verify the token through:
        //we use the JWT library to verify the token
        //and we need to know the token_key which we encrypted our information
        const decoded = jwt.verify(token, process.env.TOKEN_KEY);
        //log
        console.log({ decoded })
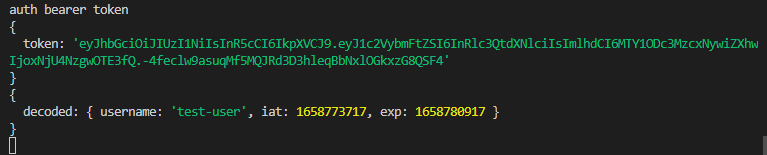
This is what we get on the console:

Reminds you of something? Yeah, that's the decoded payload we got from the JWT site, let's type our token there again to see the exact results:
remember to have your secret stored in an .env file, this is mine:
PORT=5000
TOKEN_KEY=8bf0698c0908f00edf6b4efeb837cd52baef165b9029c7a06648ef23e0a0fdfda1cdd758e67597480f74424793848596
The last line inside the try block is:
        //the middleware adds the user information to the request and sends it to the route
        req.user = decoded;
Although it's not helpful for us now what the middleware is doing is add the decoded data to the request and sends that request to the next middleware (or the endpoint it has to reach).
Now if we delete the cookie from postman:
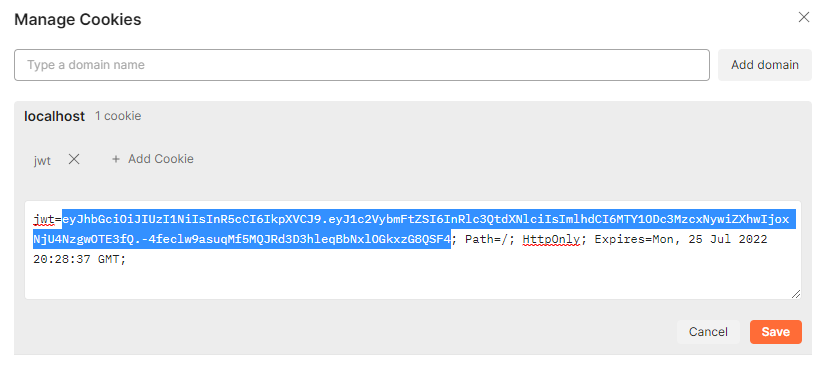
eyJhbGciOiJIUzI1NiIsInR5cCI6IkpXVCJ9.eyJ1c2VybmFtZSI6InRlc3QtdXNlciIsImlhdCI6MTY1ODc3MzcxNywiZXhwIjoxNjU4NzgwOTE3fQ.-4feclw9asuqMf5MQJRd3D3hleqBbNxlOGkxzG8QSF4
Then go to authorization, select "Bearer Token" and paste our cookie it should work the same:
Check the console:
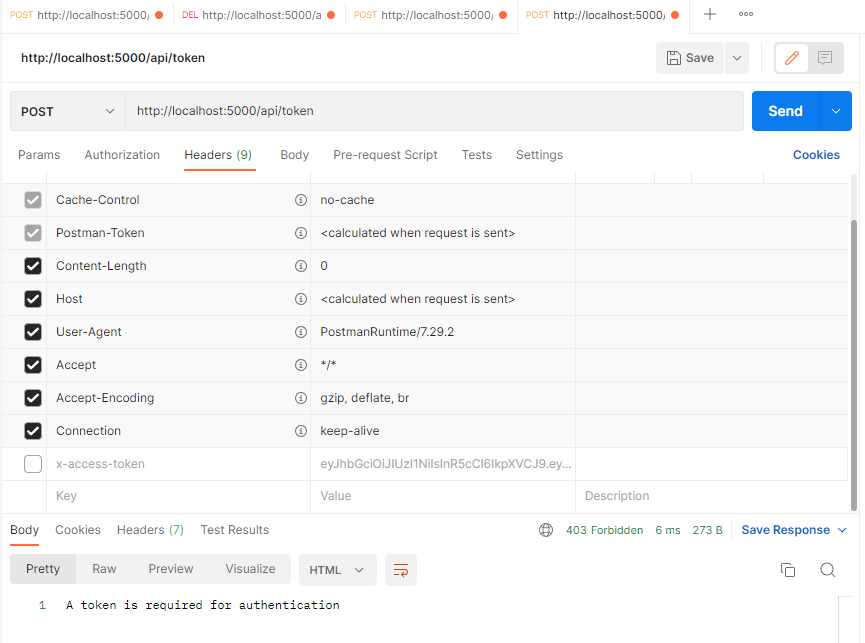
But this is not all, if we select "No Auth" and then go to Headers and add
x-access-token
as key and our token as value our authorization is going to work as well:
Finally if we get rid of everything and we don't have a token in our cookie or our headers then we won't be able to authenticate:
middleware/checkadmin
The other file inside our middleware folder is checkAdmin.js which is a middleware that checks if the user is an admin: if the user is an admin we go to the next middleware and if it's not we return a 403 status
const User = require('../../models/user')

const checkAdmin = async (req, res, next) => {
    //we get the logged user from our token middleware
    //check token @ L42
    console.log('inside checkadmin middleware')
    console.log('user from req is: ', req.user)
    const loggedUsername = req.user.username
    // console.log({loggedUsername})
    const loggedUser = await User.findOne({ username: loggedUsername })
    // console.log({loggedUser})

    if(loggedUser.role === "Admin"){
        //if the logged user is the admin
        //we go to the next action (middleware)
        //in this case the next action is calling the /updateuser endpoint
        return next()
    }
    //if the user isn't an admin return a 403
    return res.status(403).send("You are not an admin");
}

module.exports = checkAdmin
API/auth/update
Now that we understand how middleware and tokens work let's dig into how one user can update another as long as the logged user is an admin. So a logged in admin will be able to update another user to be an admin as long as we pass the id of the user we want to update.
Let's see the code from update.js
const authService = require("../../../services/authService");

//after loading the middleware we can finally call to update the user
exports.updateUserToAdmin = async (req, res, next) => {
    //get the id from the query params
    const id = req.params.id

    if (!id) {
        return res.status(400).json({ message: "missing id" });
    }

    try {
        console.log('we have passed all the middleware and we are inside updateUsertoAdmin')
        const updatedUser = await authService.updateUser(id)

        return res.status(200).json({
            message: "User updated successfully",
            updatedUser,
        });
    } catch (err) {
        return res.status(400).json({
            message: "User not updated",
            error: err.message,
        });
    }
}
It is fairly simple because all our logic is inside the authService.js:
exports.updateUser = async (id) => {

    //get the user
    const userToUpdate = await User.findById(id)
    //check if the user is already an admin
    if(userToUpdate.role === 'Admin'){
        throw new Error('The user is already an admin')
    }
    userToUpdate.role = "Admin"
    userToUpdate.save()

    return userToUpdate
}
updateUser just updates the new user we want to admin, after getting it from the database through the id.
And this logic is simple because we have abstracted the heavy lifting to our middleware, if you rememeber api/auth/router.js we have the following:
//get middleware
const verifyAccessToken = require("../middleware/token");
const checkAdmin = require("../middleware/checkAdmin");

...

//load middleware
//make sure the user is logged
router.use(verifyAccessToken);
//make sure the logged user is an admin
router.use(checkAdmin);
//if the previous middleware doesn't throw an error then we update the user
//call example: http://localhost:5000/api/auth/updateuser/62c8ed790c6812f9ddcc1100
router.route("/updateuser/:id").put(updateUserToAdmin);
Note that if the middleware fails to see a logged in user (verifyAccessToken) or fails to see that the user is an admin (checkAdmin) we won't be able to reach our /updateuser/:id route and we will get back an error.
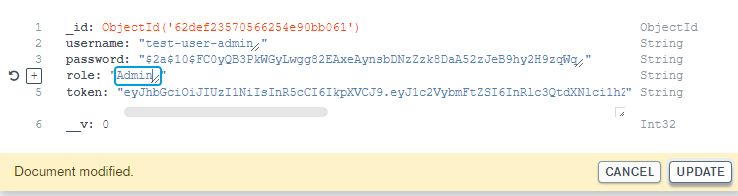
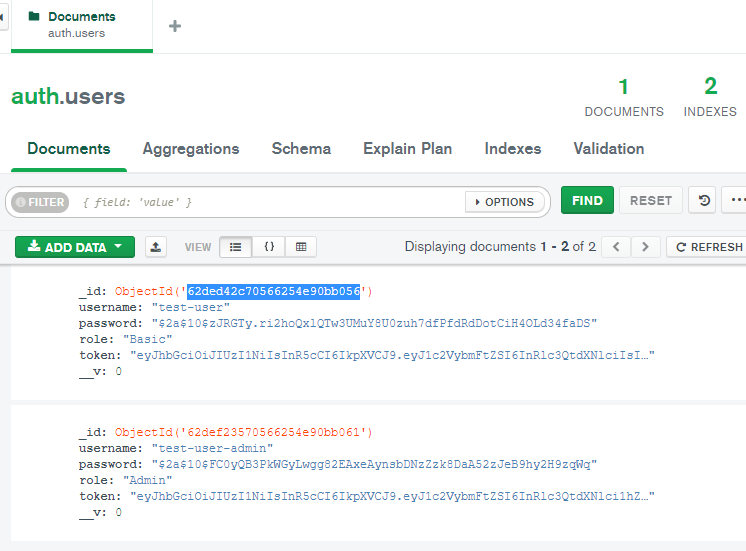
Now let's see how everything works, to begin with we need at least two users and one of them needs the role of "Admin". Since we register users with only username and password we will have to make our user an admin manually by editing the database directly (bad stuff!).
Let's create our user:
Now modify the database (note we are only doing this because it's a tutorial):
Log in with our new user who's an admin to get the token in a cookie:
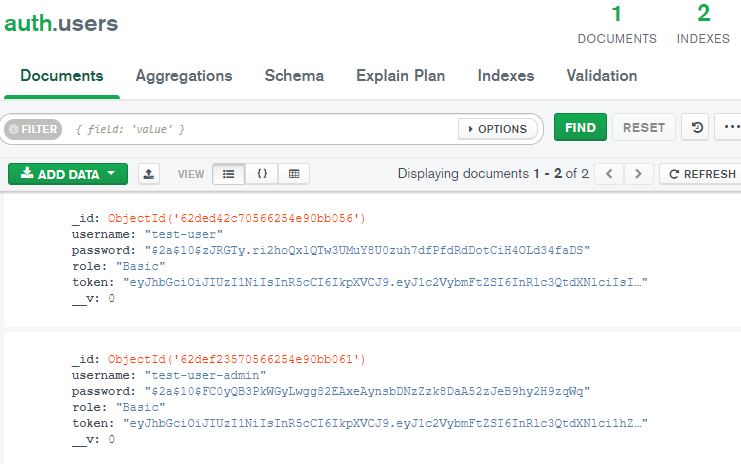
This is our database, get the id of the test-user:
Now let's do a PUT request to our endpoint:
http://localhost:5000/api/auth/updateuser/62ded42c70566254e90bb056
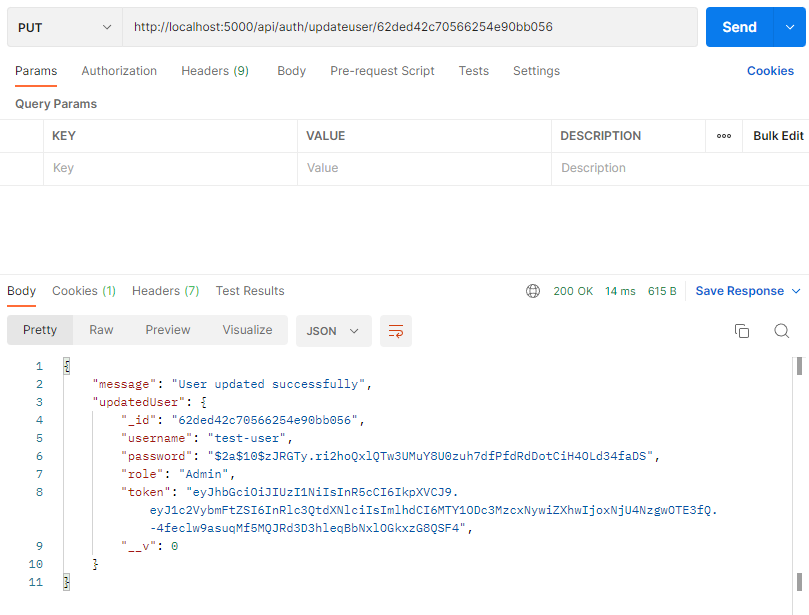
If we refresh the database again we will see that both of our users are admins:

Now if we update both users back to normal and try to update:
We will get an error:
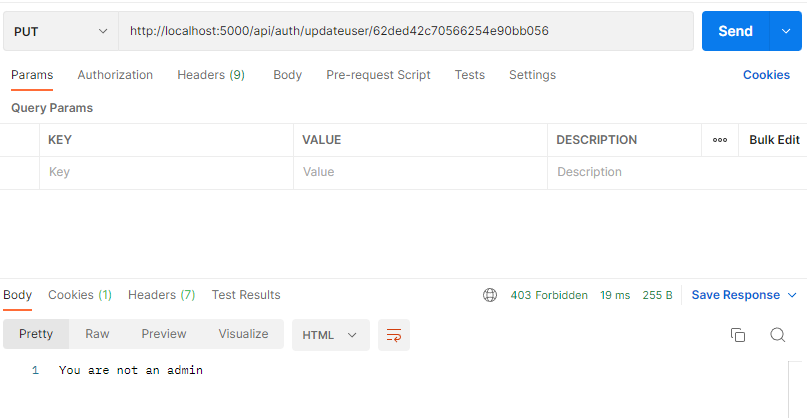
In this case our request reached verifyAdmin middleware and it failed:

You can find the exact line of code for this @ middleware/checkAdmin.js L19:
    //if the user isn't an admin return a 403
    return res.status(403).send("You are not an admin");
C'est fini
You can find the whole project on my Github.
If you want to reach out feel free to leave a comment or hit me up on Twitter as well as follow me there or on Hashnode.
Keep in mind that I haven't used any linterns or specific style guides so you might find some inconsistencies with semicolons here and there. I wanted to make a small project on auth at first but it got out of hand, hopefully this is helpful - most of the articles I saw about NodeJS and auth weren't going into as much detail or were outdated.
Thanks for reading.