Popular Design Patterns: Dependency Injection, Factory, Singleton, Observer and Strategy

Patterns are everywhere

This great comic is from False Knees and it illustrates that you can find patterns everywhere, you can also check out this National Graphic article. Your code base is no different.
The objective of this article is to understand or refresh the memory of the different patterns and then jump into Dependency Injection to do something cool.
Resources
You can find all of the code in this repository on my Github.
If you are kind of new or not sure what's all this about I recommend you read my previous blog post: Software Engineering OOP principles and good practices to avoid spaghetti code.
Additionally, I highly recommend the site Refactor Guru to learn about design patterns and refactoring.
As well as Christopher Okhravi's Youtube Channel for more in-depth videos and examples, he's a great teacher.
Tip
I recommend exploring all the resources above to have a better understanding of each pattern as my intention is to provide and simplify examples. Wikipedia is another great resource but it might be a bit too difficult for beginners.
Strategy
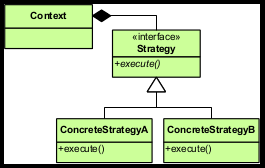
The strategy pattern allows you to select an algorithm at run time. The name is "strategy" because given a certain context you can select a strategy appropriate for that context.
This is directly related to one of the SOLID principles, the open-closed principle that states software entities (classes, modules, functions, etc.) should be open for extension, but closed for modification.
Let's look at an example with TypeScript, and if you are using any other language the most important part is you understand how the classes and interfaces work together.
//define interface we will use for different strategies
interface Strategy {
execute(str: string): string
}
//define different strategies we could use
class upperCaseStrategy implements Strategy {
public execute(str: string): string {
return str.toUpperCase()
}
}
class lowerCaseStrategy implements Strategy {
public execute(str: string): string {
return str.toLowerCase()
}
}
class Context {
//we will be using a different strategy for every situation
//however here we just define a parameter of type Strategy
//that will be changed as we wish
private strategy: Strategy
//while making the object we will include the strategy to use
constructor(strategy: Strategy) {
this.strategy = strategy
}
//in case we want to change out strategy we have a method for that
public setStrategy(strategy: Strategy) {
this.strategy = strategy
}
//we will get back the modified string according to the strategy we use
public executeStrategy(str: string): string{
return this.strategy.execute(str)
}
}
//define a string we will be using for testing
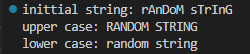
const randomString = 'rAnDoM sTrInG'
console.log('inittial string:', randomString)
//make a new context with the upper case strategy
const context = new Context(new upperCaseStrategy())
//use the current strategy (which is upperCase) to get an upper case String
const upperCaseString = context.executeStrategy(randomString)
//check it's upper case
console.log('upper case:', upperCaseString)
//change context's strategy
context.setStrategy(new lowerCaseStrategy())
//get the lower case string with a different strategy
const lowerCaseString = context.executeStrategy(upperCaseString)
//check it's lower case
console.log('lower case:', lowerCaseString)
In this example you can see how we will be able to use the same Context class throughout our entire program but by changing strategies we will be able to get different results when we call the executeStrategy method.
If you want more complex examples Refactoring Guru has a cache implementation in Go and a payment method in Java.
Dependency Injection vs Strategy
If you are somehow familiar with DI and not sure why the strategy pattern is used, I'd recommend reading this Stack Overflow Answer.
Observer

The observer pattern relies on one principle: the observable (which often is called subject or event manager) needs to notify/update the observers (which can be called subscriber) it contains about an event.
The most common case would be a notification of some kind, you want to notify your users (or a specific set of users) about something that has happened so you take the observers and push their update method.
Note that for the observers to be notified they need to be somehow connected to the observable and the observable also needs to have a way to call the notify/update methods of the observables.
Let's look at the code, but keep in mind that I'm using the words observable, subject and event manager/dispatcher interchangeably. The same goes for observer and subscriber.
//subject or event manager/dispatcher
interface Observable {
//add the observers we want to track out observable
add(observer: Observer): void
//same but delete
remove(observer: Observer): void
//notify all of the observers
notify(): void
}
//event listener
interface Observer {
name: string
//the update method will be triggered when the observable uses it
//you can pass the observable to get more context or not
update(observable: Observable): void
}
//since a lot of the examples use Subject instead of Observable let's call our class Subject
//it will be the one notifying the different observers
class Subject implements Observable {
name: string
constructor(name: string) {
this.name = name
}
//using a Map but this can just be an array
private observersMap: Map<Observer['name'], Observer> = new Map<Observer['name'], Observer>
//add the observer/subscriber to our observable/subject
public add(observer: Observer): void {
this.observersMap.set(observer.name, observer)
console.log(`added observer ${observer.name} to ${this.name}`)
}
public remove(observer: Observer): void {
this.observersMap.delete(observer.name)
console.log(`removed observer ${observer.name} to ${this.name}`)
}
//we do a forEach on our map so we can press the update method in all of them and pass the current observable/subject
public notify(): void {
//note that we allow to pass the instance of our observable to every observer, check the interface
this.observersMap.forEach((v,k,m) => v.update(this))
}
public getName(): string {
return this.name
}
//example of a possible method will have the notify method inside, note how we call it at the end to notify our observers
//this is a simple change of name but it could be anything
public changeName(name: string): void {
console.log(`changing name from ${this.name} to ${name}..`)
this.name = name
console.log(`notifications being sent..`)
this.notify()
}
}
class webObserver implements Observer {
name: string
constructor(name: string) {
this.name = name
}
update(observable: Subject): void {
console.log(`${this.name} notification from ${observable.getName()}`)
}
}
class phoneObserver implements Observer {
name: string
constructor(name: string) {
this.name = name
}
update(observable: Subject): void {
console.log(`${this.name} notification from ${observable.getName()}`)
}
}
//init all our objects
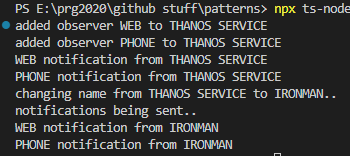
const subject = new Subject('THANOS SERVICE')
const webObs = new webObserver('WEB')
const phoneObs = new phoneObserver('PHONE')
//make sure to subscribe/add the observers the observable
subject.add(webObs)
subject.add(phoneObs)
//notify all of our observers
subject.notify()
//now let's change the name
//this is just an example of a possible change of state inside the class, it could be a new item arrival for example or something else
subject.changeName('IRONMAN')
This is the output:
If you want more examples feel free to check Refactoring Guru, here's Go and Java.
Observer vs Pub/Sub
You might have noticed that the observer pattern could end up being too tightly coupled and it's very similar to another architecture: pub/sub.
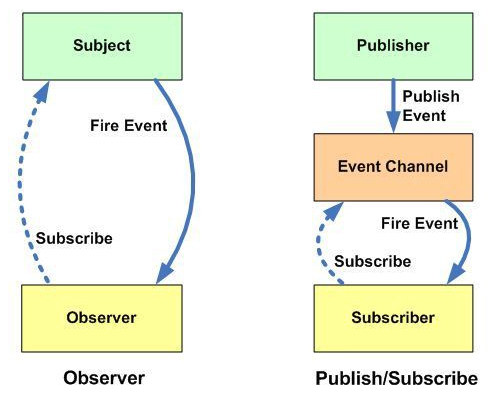
Pub/Sub is a bit different and adds complexity, however it's great if you decide to work with events as it provides a separate channel for subscribers.
Singleton
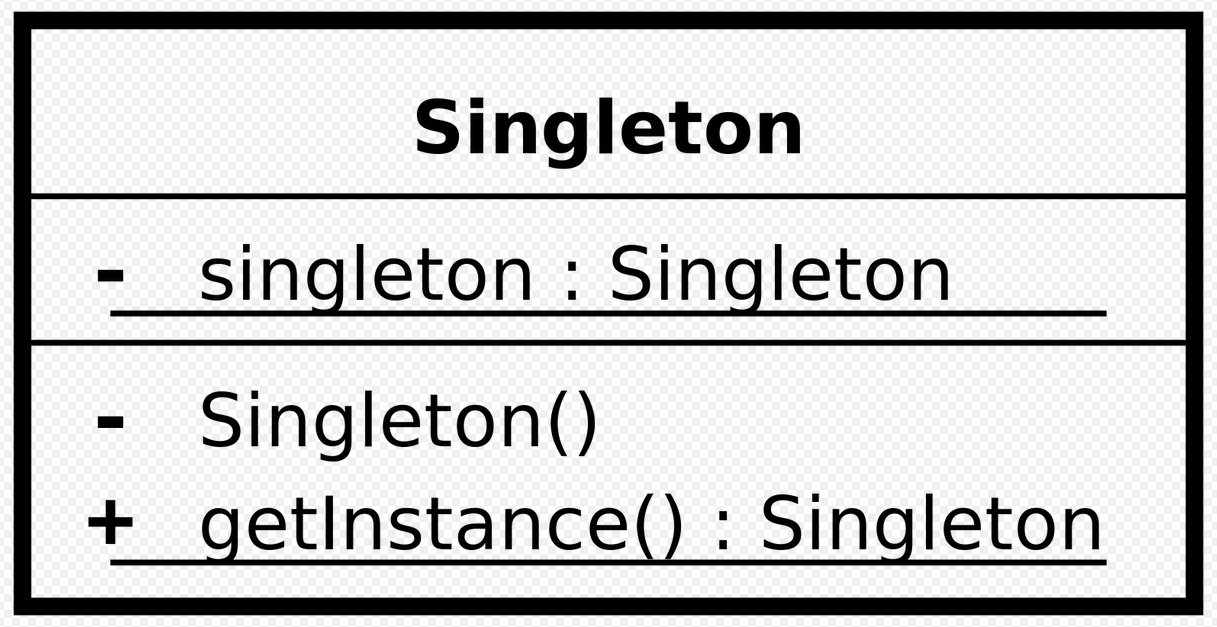
If you want to ensure there's only one instance of the class then use the singleton pattern. Although some people might argue against it this pattern is widely used, especially with database connections.
The beauty of this design is its use of the private initializer.
class Singleton {
    //here's the best part, we use a static variable to store our singleton instance
    //and make it private so we can only get it through the getsingleton() method
    private static singleton: Singleton

    private constructor() {
        console.log('starting singleton..')
    }

    //call this method every time we want a singleton
    public static getSingleton(): Singleton {

        console.log('getting singleton..')
        //if the singleton instance (static singleton) is null we will initialize it
        if(!Singleton.singleton) {
            console.log('no singleton available')
            Singleton.singleton = new Singleton()
        }

        return Singleton.singleton
    }
}

function mainProgram() {
    //... code
    const singleton1 = Singleton.getSingleton()
    const singleton2 = Singleton.getSingleton()

    if(singleton1 === singleton2) {
        console.log('same instance')
    }

}
mainProgram()
This is the output:

As always Refactoring Guru has examples in Java and Go as well.
Factory
As you can see in the UML diagram the whole point of the factory pattern is to have a specific place (interface of the factory) where you can create the needed objects. The factory is called "creator" and the objects created are called "products".
Basically what we are doing is encapsulating the business logic (a particular way of constructing objects). The principle is very simple but you can make it as complex as you want, the idea is to always have a factory method available that you can move around your codebase and get the concrete objects you want or need.
I really like this definition from Refactoring Guru:
Factory Method is a creational design pattern that provides an interface for creating objects in a superclass, but allows subclasses to alter the type of objects that will be created.
Let's look at a code example with TypeScript:
//pizza is going to be the product that a factory can make
interface Pizza {
name: string
getName(): string
cookingTime(): void
eat(): void
}
//this is just an example, NY pizza is different from Chicago pizza
class NewYorkPizza implements Pizza {
name: string
constructor(name: string) {
this.name = name
}
getName(): string {
return this.name
}
cookingTime(): void{
console.log('15min')
}
eat(): void {
console.log('eating NY pizza')
}
}
class ChicagoPizza implements Pizza {
name: string
constructor(name: string) {
this.name = name
}
getName(): string {
return this.name
}
cookingTime(): void {
console.log('30min')
}
eat(): void {
console.log('eating Chicago pizza')
}
}
//this is our creator, we can use this interfece anywhere in order to make our products(pizzas)
interface PizzaFactory {
makePizza(pizza: Pizza): Pizza
}
//lets think of different restaurants that want to make pizzas
class NewYorkRestaurant implements PizzaFactory {
makePizza(): Pizza {
return new NewYorkPizza('best NY pizza')
}
}
class ChicagoRestaurant implements PizzaFactory {
makePizza(): Pizza {
return new ChicagoPizza('best Chicago pizza')
}
}
//create our factories
const newYorkRestaurant: NewYorkRestaurant = new NewYorkRestaurant()
const chicagoRestaurant: ChicagoRestaurant = new ChicagoRestaurant()
//get the product
const myNewYorkPizza = newYorkRestaurant.makePizza()
const myChicagoPizza = chicagoRestaurant.makePizza()
//here we use our products
//this is a simple example but remember you can add a lot more logic and extend the examples
//the point of the pattern is so that you could use the factories anywhere you need
//and modify the logic inside
//try adding a delivery method for example to one of the restaurants or something concrete to the pizzas
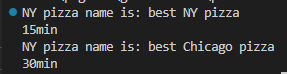
const newYorkPizzaName = myNewYorkPizza.getName()
console.log(`NY pizza name is: ${newYorkPizzaName}`)
myNewYorkPizza.cookingTime()
const chicagoPizzaName = myChicagoPizza.getName()
console.log(`NY pizza name is: ${chicagoPizzaName}`)
myChicagoPizza.cookingTime()
This is the output:
Check out additional examples from RG: Java and Go.
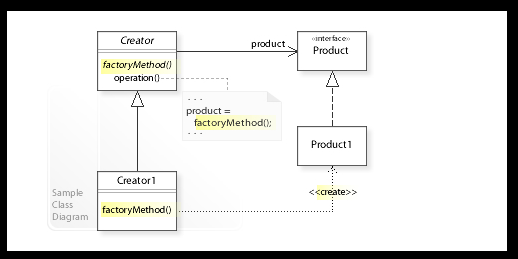
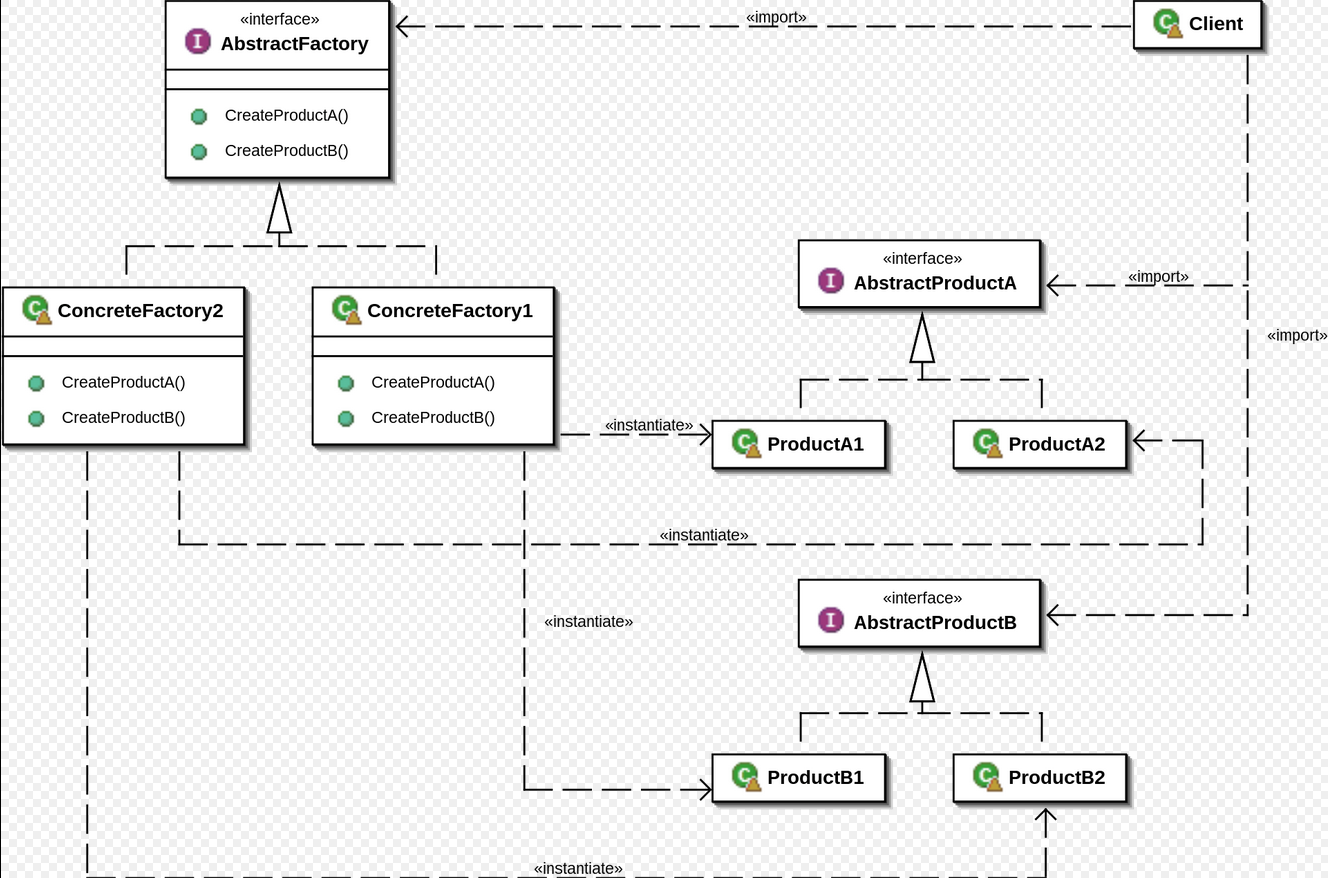
Abstract Factory
The Factory method is usually used, or well, it evolves into an Abstract Factory. As the name says, what you do is abstract the factory so you can make more concrete factories that mix different implementations of the concrete products.
This UML from Wikipedia sums it up fairly well:
Refactoring Guru uses a GUI example and I think is the best one for this pattern, so check it out:
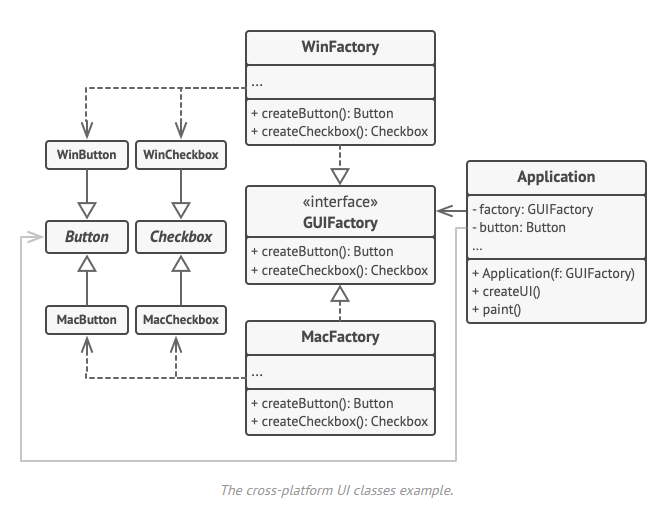
They also have pseudocode that illustrates everything going on. This Python example from Wikipedia is also pretty good.
Dependency Injection
DI is one of those concepts that can be either too easy to understand or too hard, and by this I mean even people who use it constantly might not be able to fully explain the cycle of what's going on or how it works.
My intention is to give you a general understanding so you could dive further in, or at least be able to use DI in your projects.
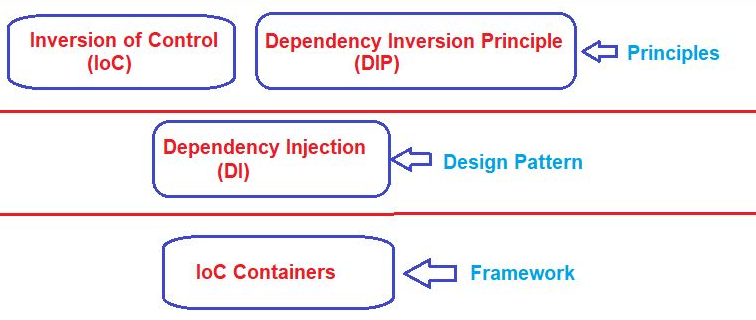
The picture above is from this article. You don't have to read it, I just want to point out there's a lot going on. Additionally for a more in depth post on Inversion of Control I recommend this article from Martin Fowler (if you don't know who he is then you should definitely check out his blog).
Dependency Injection relies on the Inversion of Control principle.
IoC
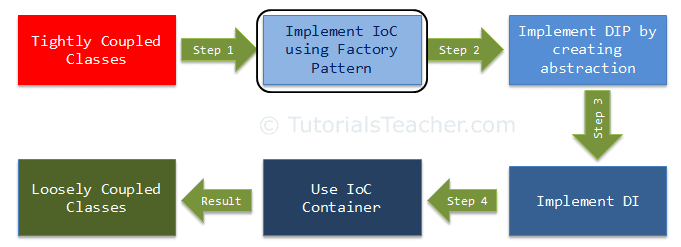
As always one of the main problems when writing software is tight coupling, in OOP you get classes entangled with each other which makes it impossible to extend or modify. This issue is mainly because the Open-Closed Principle isn't followed.
We apply Inversion of Control to loosen and decouple our classes. Invert the control of dependencies. Instead of our current class controlling the creation of a new class we want to have something in between, a layer of abstraction that will have that control instead.
IoC isn't only applied to classes but I want to make this as simple as possible.
You can think about IoC as removing the dependency for further extension.
The picture above is from this article and has some examples.
DI Example
The theory is the same as with IoC, we want to avoid hard-coded dependencies so we can maintain our code in the future. Interfaces and design patterns exist, let's use them.
Knowing all of the above let's think about how to implement Dependency Injection: the main thing we have to do is to relinquish the control of creating an object we need somewhere else. We are still going to use the object of course so we need to store it, but let's not worry about how it gets made.
The best examples I could find are from Digital Ocean (Java) and Android (Kotlin, Java) so feel free to dig in, I liked the example from Android so I'm going to simplify it with TypeScript.
Constructor Injection: You pass the dependencies of a class to its constructor.
//dependency of car that we have extracted
class Engine {

    ignite(): void {
        console.log('vroom vroom')
    }
}

//car has the engine dependency
//but it's not in charge of constructing that dependency
//only of using it
class Car {
    //we still need a variable to store the engine
    engine: Engine

    constructor(engine: Engine) {
        this.engine = engine
    }

    //use of engine after getting its dependency
    start(): void {
        this.engine.ignite()
    }
}

//make a new engine
const engine = new Engine()
//INJECT the DEPENDENCY
const car = new Car(engine)

//do your business logic
car.start()
You should get a 'vroom vroom' when you run it!

Tekbeans
If you made it all the way here congratulations!
I've started working on a TS package called tekbeans, it's on npm and of course you can check the source code on Github. It's on very early stages, however if you want to dig deeper into IoC and DI with TS then feel free to play with it. The package will be heavily inspired on Spring as it's the most famous framework with DI that uses explicit beans I believe.
Fin
As a reminder, you can find the code to all examples on my Github in the patterns repository, I will probably keep adding interesting stuff there.
You can also follow me here or reach out on Twitter or maybe even Mastodon.
It's 4 AM right now as I'm finishing this article, so if it has helped you in any way let me know, insults are welcome as well since this is the internet.