MERN Stack: use MongoDB with Node.js and Express through a RESTful API

Intro
You will learn how to make a full RESTful API that connects with a real database. The endpoints contain all the CRUD operations and you will apply modern techniques like ES6 export modules and async/await functions, as well as the relevant libraries to make building the project a breeze.
Here's the repository for the project and you can find me on Twitter @tekbog.
Setup
 Do
Do
npm init
The install all the dependencies
npm install express nodemon dotenv cors express-async-errors mongoose
Afterwards modify the package.json by adding
"type":"module",
right after
"main": "index.js",
this will allow us to use ES6 exports.
Once that's done we will modify the "scripts" part. You run those scripts by typing
npm run name_of_script
We will add:
    "start": "node index.js",
    "dev": "nodemon index.js",
That way whenever you type
npm run dev
it will be equal to
nodemon index.js
Nodemon is a tool that restarts the server every time a line of code is modified. It's only used for development purposes.
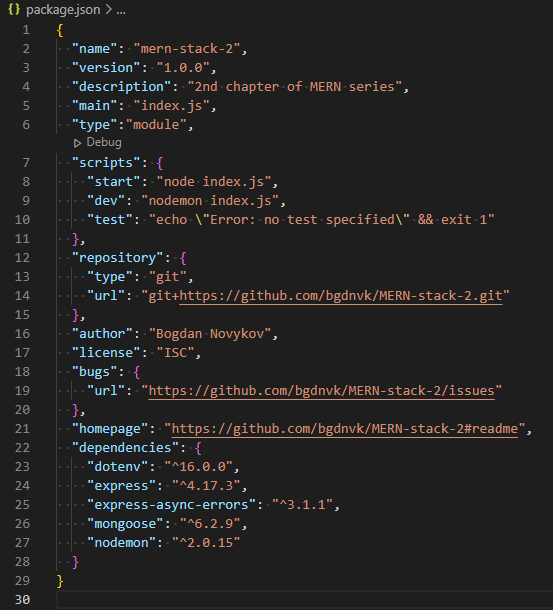
Your package.json should look like this now:
Project Structure
The project structure is going to look as follows:
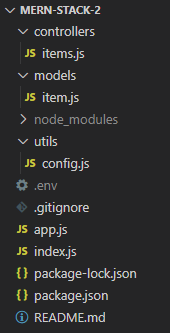
Controllers folder will contain our endpoints and the way we interact with them.
Models folder will have the model of our database, we will use that model in our controller items.js.
Utils is generally a folder for anything non-specific but you don't want floating around in the project, in our case it will contain a configuration file.
App.js is the server itself where we will be importing from controllers and models.
Index.js is the main point that starts everything, we will import our server/app there.
Then there's package.json that contains all the dependencies and information about the project.
.gitignore && .env
.gitignore is there if you are using Git, make sure to ignore your node_modules folder as it should only be installed locally or on the server. We will also be ignoring our .env file through .gitignore since it will contain information we can't expose.
.env is there so you can use the dotenv library and use all the keys and passwords without exposing anything outside. If you aren't pushing your code anywhere then feel free to ignore process.env variables and write them as consts in your code.
MongoDB Atlas
We will be working with a real database and its free tier. If you are unfamiliar with it then have a quick look at their guide here.
However the TL;DR is: get your mongodb URI and put it into the .env file like this
MONGODB_URI=mongodb+srv://YOUR_USER:YOUR_PASSWORD@cluster0.pekyz.mongodb.net/YOUR_DATABASE?retryWrites=true&w=majority
PORT=3001
Note that you have to use the information of your account but don't confuse your own login with your database account.
Mongoose Schema
Let's start with the models folder. Inside we will put the schema of our data. Object databases don't need schemas however it's always good practice to have one. If you don't want to dig into databases right now just know that here you are defining a model of the data your database will be storing.
The easiest way to interact with MongoDB is the mongoose library.
item.js
//in order to communicate with mongoDB we will use mongoose
//it simplifies the process
import mongoose from "mongoose"
//we define the schema of the database
//description field is a string and likes is a number
const itemSchema = new mongoose.Schema({
    description: String,
    likes: Number
})
//we modify the schema and pass it to JSON
//mongoDB adds two fields we don't necessarily want
//_id is the id the objects get randomly assigned
//we transform _id into a string variable called .id and delete _id
//we also delete __v
//try the data without deleting __v
itemSchema.set('toJSON', {
    transform: (document, returnedObject) => {
        returnedObject.id = returnedObject._id.toString()
        delete returnedObject._id
        delete returnedObject.__v
    }
})
//mongoose needs you to define a 'model' with your schema
//then use that model to operate with different functions
const Item = mongoose.model('Item', itemSchema)

export { Item }
Endpoints with async functions
The controllers folder could also be named API as it serves the routes/endpoints for our server. Once we have the user requesting HTTPS methods on those endpoints we will direct those requests to the database through our Mongoose model as you will see in the code.
It works as follows: the user interacts with the frontend, we receive an event through it that triggers our server's backend through the api we have designed, the api then interacts with the database through the different models. The database sends back the information to the server and the server sends it back to the frontend.
user -> frontend sends an event -> server receives the event through a HTTP method (GET, POST, UPDATE, DELETE) -> server calls the database through the model
Then depending if the interaction with the database is successful we send information back to the user
DB -> server -> frontend -> user
Here we will be using the Router object from Express as it simplifies development. We will then use the mongoose schema to interact with the database. Everything is done with async/await functions instead of promises, if you are unfamiliar with them the main thing is: those functions wait for the data so everything works properly.
NB: You will find the concept Middleware everywhere in the backend, it just means a function that modifies the data object and usually passes it to the next point.
items.js
import { Router } from "express"
import { Item } from "../models/item.js"
//define our router object
const itemsRouter = Router()
//GET or READ endpoint
//it's an async function that waits for the data thanks to await
//we get the data from the database by using our mongoose model
//one of the methods at the moongoose model is .find where you can get whatever you want
//find is empty so we get all the data
//afterwards we return a successful status and the JSON data
itemsRouter.get('/', async (req, res) => {
    const items = await Item.find({})
    res.status(200).json(items).end()
})
//in order to use a paramater we need to put ":id"
//then we can use the value of that "id" through req.params.id
//req stands for request, res stands for response
itemsRouter.get('/:id', async (req, res) => {
    const item = await Item.findById(req.params.id)
    //check if the object exists and deliver the relevant status
    if(item){
        res.status(200).json(item).end()
    } else{
        res.status(404).end()
    }
})
//POST or CREATE ednpoint
//we get the data sent to the server through req.body
itemsRouter.post('/', async (req, res) => {
    const body = req.body
    //if the request is missing the description field deliver a 404
    if(!body.description) return res.status(400).end()
    //make the object we are going to insert into the database
    //we get the content from body
    //the id is self generated so we don't have to make one
    //if the likes doesn't exist we will put 0
    const itemObj = new Item({
        description: body.description,
        likes: body.likes || 0
    })
    //save the new object into our database and return a CREATED status
    const savedItem = await itemObj.save()
    res.status(201).json(savedItem).end()
})
//DELETE endpoint
//we search for the object through the id and delete it from our DB
itemsRouter.delete('/:id', async (req, res) => {
    await Item.findByIdAndRemove(req.params.id)
    res.status(204).end()
})
//PUT or UPDATE endpoint
itemsRouter.put('/:id', async (req, res) => {
    const body = req.body
    //we make a new object just like with POST
    const itemObj = {
        description: body.description,
        likes: body.likes
    }
    //findAndUpdate requires the id and then the object you are inserting
    const updatedItem = await Item.findByIdAndUpdate(req.params.id, itemObj)
    res.status(201).json(updatedItem).end()
})

export { itemsRouter }
Utils
This is just good practice to hide sensitive information in your .env file.
config.js
//we need this library to use our .env file
import 'dotenv/config'
//get the variables from the .env file
const PORT = process.env.PORT
const MONGODB_URI = process.env.MONGODB_URI

export {
    PORT,
    MONGODB_URI
}
Server
Here's is where will unite everything and establish a connection to our database. We use mongoose to connect to MongoDB Atlas through an async function. Note that we are using a express-async-errors library so we never had to catch the errors, however in this particular case you can see how to deal with a try/catch block in case the connection to the database fails.
After the database connection we use middleware to make our server work, first one allows the server to parse everything as JSON and second is our Router object that has all our endpoints. If we were to put this on the internet you'd also need to use CORS.
app.js
//example on how to import the whole object called config
import * as config from './utils/config.js'
//get the express object and assign it to app
import express from "express";
const app = express()
//express router
import { itemsRouter } from './controllers/items.js'
//mongoose is needed to connect to the database
import mongoose from 'mongoose'
//async function so we can connect to the database
//throws an error if the connection fails
const connectToDB = async () => {
    try {
        await mongoose.connect(config.MONGODB_URI)
        console.log(`connected to the database`)
    } catch (e) {
        console.log(`error connecting to the db: ${e}`)
    }
}
//run the function so we are connected to the database
connectToDB()
//------------- middleware -------------//
//allow the server read json data
app.use(express.json())
//define the endpoint: localhost:3001/api/items for the router
app.use('/api/items', itemsRouter)

export { app }
Then we import everything into index.js which is our entry point.
//import the app object
import { app } from './app.js'
//get the port from .env
import { PORT } from './utils/config.js'
//run the server on the app object with the defined port
app.listen(PORT, () => {
    console.log(`server running on port ${PORT}`)
})